I recently finished the long journey of my cyclone purchase, installation and measurements. This simple project turned into a long saga for me, not because of the cyclone, but because I had a desire to really do a better job of organizing my shop above and beyond the cyclone installation.
I started out reading what I could on this and other forums. I decided on the Clear Vue product vs. the competitor in large part due to Bill Pentz's research and a few e-mail conversations I had with him. My thanks to Mr. Pentz for all his work which has really helped me make decisions on hardware, ducting, design and implementation in my shop.
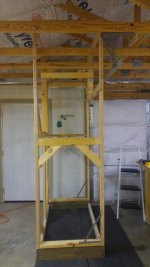
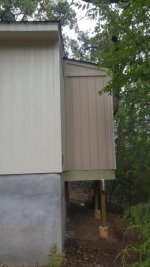
My original plan was to build a stand alone structure in my somewhat small 20'x24' shop. The structure was as small as possible based on the measurements others have posted here. After building the structure, I realized it was taking up quite a bit of my precious tool real estate. I decided to take the long road and build a small addition to my shop to house not only the cyclone, but also my air compressor and wet-vac. That would have been simple, had my shop not been built on a slope. So, I had to build the small structure about 4 feet above grade, on a slope which complicated things. I expect to add pictures to this post at the end. That part of the project took a week to complete and then I got working on the inside of the build.
But first, here is a cautionary tale to those working alone on this cyclone. Before deciding to build an addition, I actually hung the main portion of the cyclone on the frame structure I had built in the shop. It was rather difficult to hang the motor by myself and was just barely able to do it. I then attached the cyclone body and thought I was done for the day, when I realized I had not properly attached the cyclone body to the blower housing. In my attempt to not over torque the screws, I actually had left a space between the two mating surfaces. So, had to bring the cyclone back down, attach it properly and then put it back on. At this point, I should have realized it was getting late and I was getting tired. But noooooo, I wanted to get at least this portion of the assembly complete. I had used a large trash can with a piece of lumber on the can to support the cyclone body while I aligned the clips on the blower housing. It was then that tragedy struck. The board supporting the cyclone came off the trash can and the entire cyclone and housing came crashing to the ground. The housing is side heavy and I was not able to control the fall. The bad news is that the blower housing landed on the filter transition and it basically exploded. The good news is that the cyclone body was unharmed and no other parts were damaged.
Thanks to Clear Vue support, in a few days I had a new filter transition. It was, however, an expensive lesson.
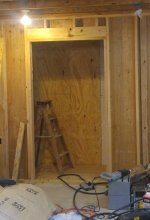
During my wait for the new parts I decided to take my time and build the small addition to the shop to house the cyclone and a few other items. What a great idea that was! I insulated that area and the cyclone is extremely quiet. I also have room for my air compressor and a few other items.
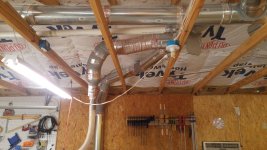
After weeks of working on the exterior addition, putting together the cyclone and totally re-working my shop's 6" ducting, the system is working way beyond my expectations. I will add noise level and air measurements on future posts. One important change I made was to run the ducts above the rafters, thus freeing up the space taken by running the plumbing along the walls. Previously I had been using a Jet dust collector motor with a Thien baffle. I did not make any vertical runs due to the poor performance of that small unit. The jet dc was not designed to run a shop wide system....although it tried.
Once the addition was complete, the assembly of the cyclone was easy. It should be, it was my third time. I did contact clear vue support several times to clarify some issues and they were always more than ready to help and explain. I did mention to them that they need to re-write the assembly manual. Frankly, as a technical assembly manual it falls short and could be improved.
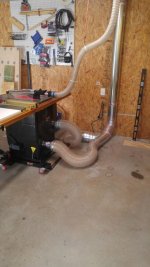
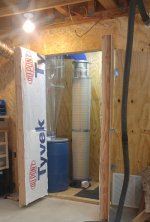
The height at which I installed the motor assembly would have required to make a small stool or table to raise the height of the filters. Instead, I decided to leave the filters on the floor and make a metal tube to connect the housing to the top of the filters. I used two 9" HVAC start collars to create the tube, sealed with some metal tape and it works perfectly.
Electrical hookup was straight forward after I reviewed some of the posts on the 240v. electrical setup on these forums. The remote system works extremely well and IMHO is a must have.
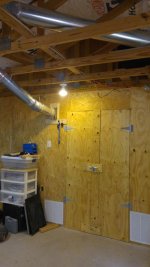
In order to be able to keep the doors closed on my little addition, to keep the noise down, I built the type of plenum mentioned on some other posts using the wall stud cavity. If you look closely at the pictures, you can see two white registers at the bottom of those plenums. The opposite side, in the cyclone enclosure, have holes at the top of the cavity to allow the air to find its way into the plenum. When the cyclone is running, I am amazed at the amount of air rushing out of the registers.
I had originally planned on venting the cyclone to the outside, but am very familiar with the issue of outside temperatures rushing into a temperature controlled shop. After using the filters for a few days, I think I will forgo the outside vent plan in order to keep my conditioned air in the shop.
Next post will contain some more pictures and measurements I have taken of the system in action.
Please take your time with your build and don't do what I did. Get someone to help you with the installation. I am so very appreciative of Clear Vue's support during my mishap. These folks are just outstanding! This product is just outstanding! Yes, it takes some 'assembly', but it is well worth it when the system is running.
I started out reading what I could on this and other forums. I decided on the Clear Vue product vs. the competitor in large part due to Bill Pentz's research and a few e-mail conversations I had with him. My thanks to Mr. Pentz for all his work which has really helped me make decisions on hardware, ducting, design and implementation in my shop.
My original plan was to build a stand alone structure in my somewhat small 20'x24' shop. The structure was as small as possible based on the measurements others have posted here. After building the structure, I realized it was taking up quite a bit of my precious tool real estate. I decided to take the long road and build a small addition to my shop to house not only the cyclone, but also my air compressor and wet-vac. That would have been simple, had my shop not been built on a slope. So, I had to build the small structure about 4 feet above grade, on a slope which complicated things. I expect to add pictures to this post at the end. That part of the project took a week to complete and then I got working on the inside of the build.
But first, here is a cautionary tale to those working alone on this cyclone. Before deciding to build an addition, I actually hung the main portion of the cyclone on the frame structure I had built in the shop. It was rather difficult to hang the motor by myself and was just barely able to do it. I then attached the cyclone body and thought I was done for the day, when I realized I had not properly attached the cyclone body to the blower housing. In my attempt to not over torque the screws, I actually had left a space between the two mating surfaces. So, had to bring the cyclone back down, attach it properly and then put it back on. At this point, I should have realized it was getting late and I was getting tired. But noooooo, I wanted to get at least this portion of the assembly complete. I had used a large trash can with a piece of lumber on the can to support the cyclone body while I aligned the clips on the blower housing. It was then that tragedy struck. The board supporting the cyclone came off the trash can and the entire cyclone and housing came crashing to the ground. The housing is side heavy and I was not able to control the fall. The bad news is that the blower housing landed on the filter transition and it basically exploded. The good news is that the cyclone body was unharmed and no other parts were damaged.
Thanks to Clear Vue support, in a few days I had a new filter transition. It was, however, an expensive lesson.
During my wait for the new parts I decided to take my time and build the small addition to the shop to house the cyclone and a few other items. What a great idea that was! I insulated that area and the cyclone is extremely quiet. I also have room for my air compressor and a few other items.
After weeks of working on the exterior addition, putting together the cyclone and totally re-working my shop's 6" ducting, the system is working way beyond my expectations. I will add noise level and air measurements on future posts. One important change I made was to run the ducts above the rafters, thus freeing up the space taken by running the plumbing along the walls. Previously I had been using a Jet dust collector motor with a Thien baffle. I did not make any vertical runs due to the poor performance of that small unit. The jet dc was not designed to run a shop wide system....although it tried.
Once the addition was complete, the assembly of the cyclone was easy. It should be, it was my third time. I did contact clear vue support several times to clarify some issues and they were always more than ready to help and explain. I did mention to them that they need to re-write the assembly manual. Frankly, as a technical assembly manual it falls short and could be improved.
The height at which I installed the motor assembly would have required to make a small stool or table to raise the height of the filters. Instead, I decided to leave the filters on the floor and make a metal tube to connect the housing to the top of the filters. I used two 9" HVAC start collars to create the tube, sealed with some metal tape and it works perfectly.
Electrical hookup was straight forward after I reviewed some of the posts on the 240v. electrical setup on these forums. The remote system works extremely well and IMHO is a must have.
In order to be able to keep the doors closed on my little addition, to keep the noise down, I built the type of plenum mentioned on some other posts using the wall stud cavity. If you look closely at the pictures, you can see two white registers at the bottom of those plenums. The opposite side, in the cyclone enclosure, have holes at the top of the cavity to allow the air to find its way into the plenum. When the cyclone is running, I am amazed at the amount of air rushing out of the registers.
I had originally planned on venting the cyclone to the outside, but am very familiar with the issue of outside temperatures rushing into a temperature controlled shop. After using the filters for a few days, I think I will forgo the outside vent plan in order to keep my conditioned air in the shop.
Next post will contain some more pictures and measurements I have taken of the system in action.
Please take your time with your build and don't do what I did. Get someone to help you with the installation. I am so very appreciative of Clear Vue's support during my mishap. These folks are just outstanding! This product is just outstanding! Yes, it takes some 'assembly', but it is well worth it when the system is running.
Attachments
Last edited: