This is an update to my earlier post about shrinking the size of my mini cyclone setup.... I love my mini-Clearvue cyclone but didn't like how I had it setup at all, I was in a rush to use it and did what most guys do....bolted it to the top of a 5 gallon bucket and attached it to the side of my shop vac....it function great...but tipped over ALOT and was way to big to move around (I use this for in car or in bay stuff like spot grinding or even just vaccuming cars and gets alot of drywall service so it needs to be portable) ...the hoses sticking out the sides and top were annoying also, just too big of a footprint and not stable at all, I had bricks in the empty shop vac bucket to keep it from tipping over if you looked at it wrong and still tipped over...did I mention I HATED that empty shop vac bucket...what a waste of space...with a mini hooked up you get nothing in that bucket....anyway there is picture of how it looked before below.
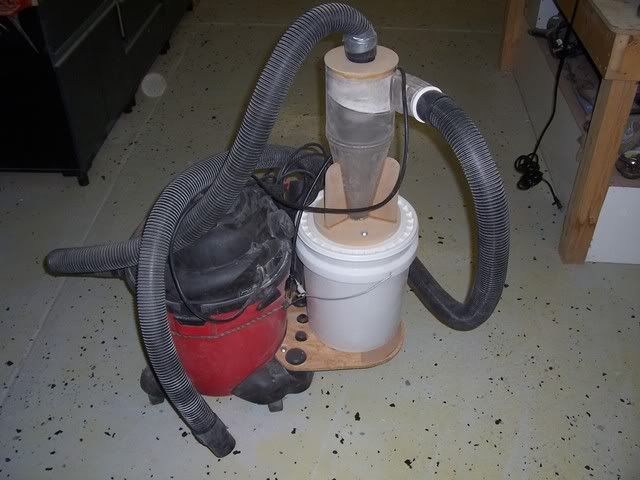
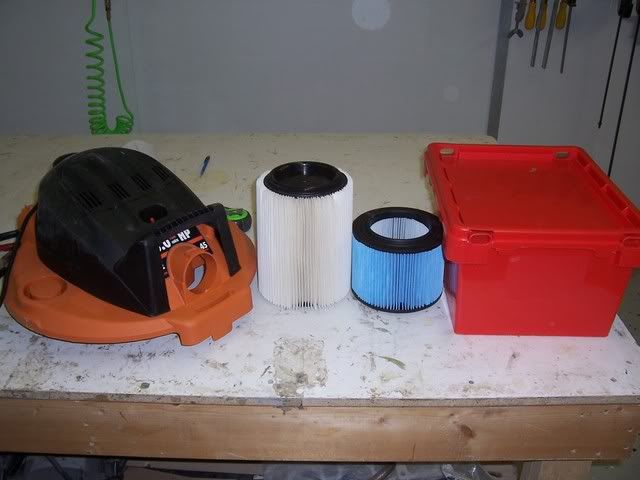
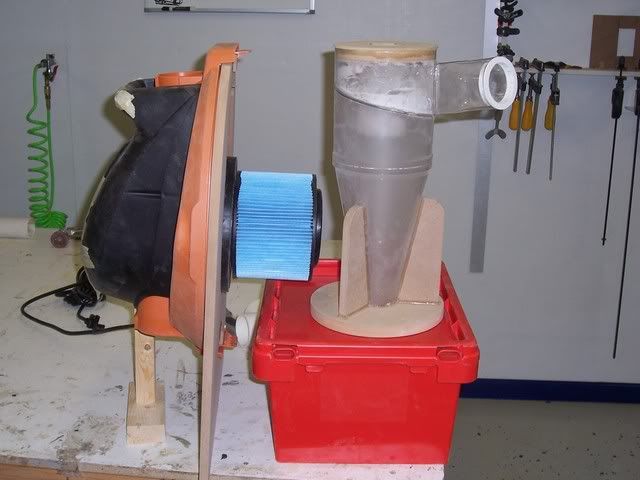
First goal was to shrink that shop vac bucket but 99% of the vacs out there have the suction hose in the bucket....not so easy to get rid of the bucket with this setup...so I stumbled onto a Rigid at the Depot that was on sale which had the suction inlet and air outlet in the lid of the vacuum with the motor...sweet no more need for the bucket. Next up to find was a shorter container for the dust under the mini....with a 5 gallon and hose out the top it was easily at waist height if not more...found a cool square bucket at McMaster carr that is made to ship hazardous stuff so it seals up like crazy (has to be air tight) with a rubber gasket and lots of snaps...not as big, almost 4 gallons I think but that's plenty for me, this isn't on my router table or anything like that. Another picture below of the parts. The white filter on the left came with the rigid, the blue on the right is a hepa replacement filter that is suppose to go on a smaller rigid vac but I wanted it as short as possible, it saved me over 3" which you'll see below helped keep the footprint down, better filter but smaller and frankly not much gets filtered by it so I used it.
Anothe picture show the setup before construction...filter hangs over the bucket which is low enough to go under it, the rigid doesn't need any real bucket around it, just enough area for air to flow from the suction port around the filter...what I built is bigger than it needs to be but it looked better than just a flat board and cylinder around the filter
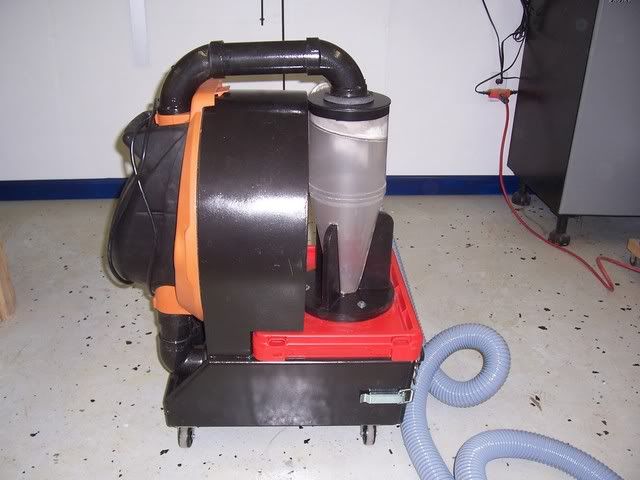
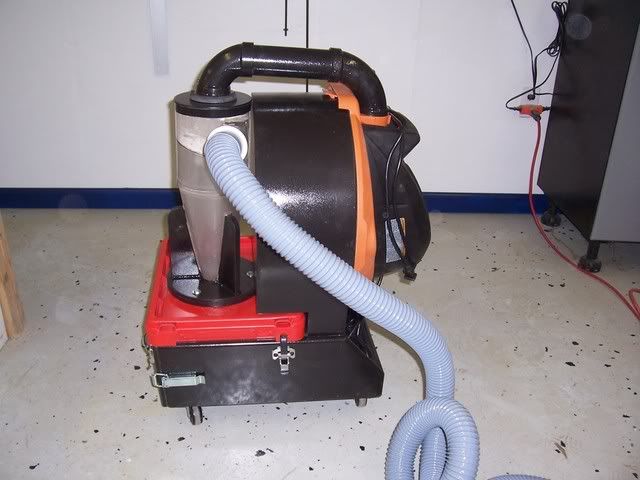
Unfortunetly my camera batteries were dead during most of the construction but you can tell what went on, the half cylinder around the top of the rigid enclosing the filter is mdf front and back and bendable plywood around the curve, base is all primed and painted mdf, rubber casters and some snap locks I found on mcmaster to hold down the mini and bucket. The front hinged down to slide out the mini and bucket to empty. I hard piped from the rigid to the mini with 2" pvc, figured it would help with suction, looks better, kept height lower than it was with the hose , actually works well as a handle to roll it around and it looks better While I was at it I found a dead area under the filter box...the exhaust of the rigid was right there so I used pvc to duct the exhaust into it and made a muffler for it...basically a tube lined with eggcrate foam....made it a big quieter, not as much as I had hoped but it was an afterthought I'll have to take a picture from the back to see it, just noticed there isn't one.... finished picts below...to many pictures, have to add them in a reply I guess...
Overall the big thing is it much more stable, lower and easier to work with...still have to work on what to do with the hose though...this one might be a big long but I had to order 10ft of it from McMaster so I might cut it down...this is some kind of vacuum hose and way heavier than it needs to be but it had those screw on cuffs available which work great and is much more flexible than that crap shop vac hose, hate that stuff....overall I'm happy...but spent way to much time on it") Everyone who sees it asks about it though, bit of a conversation piece....
Everyone who sees it asks about it though, bit of a conversation piece....
Dang I can't get the pictures to show up...not allowed on this forum, just links?
First goal was to shrink that shop vac bucket but 99% of the vacs out there have the suction hose in the bucket....not so easy to get rid of the bucket with this setup...so I stumbled onto a Rigid at the Depot that was on sale which had the suction inlet and air outlet in the lid of the vacuum with the motor...sweet no more need for the bucket. Next up to find was a shorter container for the dust under the mini....with a 5 gallon and hose out the top it was easily at waist height if not more...found a cool square bucket at McMaster carr that is made to ship hazardous stuff so it seals up like crazy (has to be air tight) with a rubber gasket and lots of snaps...not as big, almost 4 gallons I think but that's plenty for me, this isn't on my router table or anything like that. Another picture below of the parts. The white filter on the left came with the rigid, the blue on the right is a hepa replacement filter that is suppose to go on a smaller rigid vac but I wanted it as short as possible, it saved me over 3" which you'll see below helped keep the footprint down, better filter but smaller and frankly not much gets filtered by it so I used it.
Anothe picture show the setup before construction...filter hangs over the bucket which is low enough to go under it, the rigid doesn't need any real bucket around it, just enough area for air to flow from the suction port around the filter...what I built is bigger than it needs to be but it looked better than just a flat board and cylinder around the filter
Unfortunetly my camera batteries were dead during most of the construction but you can tell what went on, the half cylinder around the top of the rigid enclosing the filter is mdf front and back and bendable plywood around the curve, base is all primed and painted mdf, rubber casters and some snap locks I found on mcmaster to hold down the mini and bucket. The front hinged down to slide out the mini and bucket to empty. I hard piped from the rigid to the mini with 2" pvc, figured it would help with suction, looks better, kept height lower than it was with the hose , actually works well as a handle to roll it around and it looks better While I was at it I found a dead area under the filter box...the exhaust of the rigid was right there so I used pvc to duct the exhaust into it and made a muffler for it...basically a tube lined with eggcrate foam....made it a big quieter, not as much as I had hoped but it was an afterthought I'll have to take a picture from the back to see it, just noticed there isn't one.... finished picts below...to many pictures, have to add them in a reply I guess...
Overall the big thing is it much more stable, lower and easier to work with...still have to work on what to do with the hose though...this one might be a big long but I had to order 10ft of it from McMaster so I might cut it down...this is some kind of vacuum hose and way heavier than it needs to be but it had those screw on cuffs available which work great and is much more flexible than that crap shop vac hose, hate that stuff....overall I'm happy...but spent way to much time on it
Everyone who sees it asks about it though, bit of a conversation piece....Dang I can't get the pictures to show up...not allowed on this forum, just links?