Building a noise-blocking closet

Jameel Abraham

New member
I've had a ClearVue for a few months now and am just getting around to setting it up in a more permanent arrangement. Using some info from the threads here and from Ed, I decided to post about this project in case some others might have some tips or suggestions. So here goes.

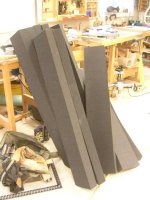
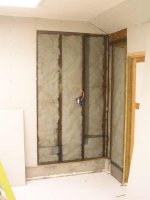
After reading about the duct board from another thread and talking with Ed about it, I did a little web searching about soundproofing. I quickly learned that there are two approaches to dealing with the unwanted sound. Sound absorption, and sound blocking. Closets and enclosures that utilize open face batts of fiberglass insulation or duct board are using sound absorption. In talking with Bill at soundprooffoam.com I learned that soundproofing can be done more effectively with a thinner material than sound absorption. One caveat though, using an absorbing material (batts or foam or duct board) in conjuction with a blocking material (high mass vinyl barrier) reduces medium to low frequencies.

Some of this stuff is pretty expensive, and I still haven't decided what to go with, still researching at the moment. I'm confident that I'd be satisfied with a typical 2x wall and open face batts like Ed has done, and its very cheap to do. But I also like the idea of using a thinner wall system to save some shop space. Yeah, I know I'm only talking about a couple inches here give or take. We'll see what happens.

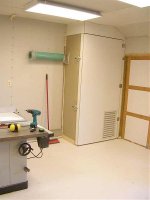
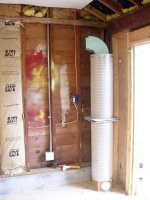
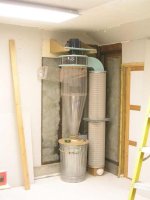
Here's the area where the CV will go.
 

Attachments

  • DSCN4911.JPG
    DSCN4911.JPG
    38 KB · Views: 11
Sound Proofing

Sound Proofing

Jameel,

Well it looks like you are well on your way to getting your system up and running. You could always add the thinner stuff later on for sound proofing if you aren't happy with the results from the sound absorption method. When i built my 4 x 8 room to house DC and air compressor i was in the middle of sheetrocking the shop so i just continued on into that room as well and needless to say from a sound standpoint that was a bad idea. I lined the inside of my dc room with carpet and it is relatively quiet now. I can't say that its any better than if the sheetrock wasn't there.

Keep us posted,

Matt
 
Making progress

Making progress

I got the outside wall insulated and covered with screen. I figured why not leave the drywall off this area and gain some sound absorption?

I've decided that I don't have a lot of time to make my enclosure exactly like I wanted. I was hoping to keep the dust bin outside the enclosure, but it's just not working out.

Now I'm thinking about making the whole front panel like a big door so I can just swing it out to empty the bin or service the collector. Figuring out how to make this seal nicely is another matter. I'm wondering if weather stripping will be sufficient? How to seal the bottom too and still allow it to swing without hitting the floor? Maybe a wood strip along the floor that the door closes against with some weather stripping along it?

I'm also still deciding how to soundproof the walls of the enclosure. I'm always procrastinate ordering things, so I may just go with more unfaced batts. I picked up some 3" thick open cell "black" foam from the recycling dock at a local industrial manufacturer. I wonder how this stuff works compared to batts of fiberglass?

I have pretty sensitive ears and and wear muffs all the time anyway, so perhaps I'll just put enough into this to take the edge off. Not like my other machines are quiet anyways. Ugh, what a dilemma....
 

Attachments

  • DSCN4923.JPG
    DSCN4923.JPG
    31.5 KB · Views: 11
  • DSCN4924.JPG
    DSCN4924.JPG
    22.2 KB · Views: 12
  • DSCN4918.JPG
    DSCN4918.JPG
    20.1 KB · Views: 7
Vent, Door

Vent, Door

Hi, Jameel,

Two quick points, maybe you've already thought of them.

One, you'll need a way for air that goes through the cyclone & filters to return to your shop. Others have done this various ways, but for yours, I think I'd try some sort of slotted baffle arrangement.

Two, the door. I've seen an installation in the gallery that has a door hinged at the top. I always wondered why that orientation was chosen, for it would seem to me a more standard type door, hinged along one side, would be easier. Think the photos of Clearvue's new shop (gallery) have this sort of arrangement.

If you choose this more standard door, the baffle to return air to the rest of the shop can be sort of a box, open end down, and a slot in the door near the closed, top portion of the box.

Hope when you're finished you make a "story" out of it in the gallery. Looks like it'll help the rest of us, and any new viewers, figure out how they're going to do their install.

Regards,

DWD
 
Last edited:
Jameel,

You have been busy! Looks like everything is moving right along. I would say to go with a standard door on the front whether it is pre-hung leaun door or made yourself and return with baffle on the side. It's just much easier to open the door to check and empty dust bin. Depending on what you are doing you could easily fill it up pretty quickly. We empty ours once a day with fine mdf dust. Make it as easy on yourself as possible.

As far as noise concerns I think you will be suprised at how much the batting will help.

Matt
 
Hi, Jameel,

Two quick points, maybe you've already thought of them.

One, you'll need a way for air that goes through the cyclone & filters to return to your shop. Others have done this various ways, but for yours, I think I'd try some sort of slotted baffle arrangement.

Two, the door. I've seen an installation in the gallery that has a door hinged at the top. I always wondered why that orientation was chosen, for it would seem to me a more standard type door, hinged along one side, would be easier. Think the photos of Clearvue's new shop (gallery) have this sort of arrangement.

If you choose this more standard door, the baffle to return air to the rest of the shop can be sort of a box, open end down, and a slot in the door near the closed, top portion of the box.

Hope when you're finished you make a "story" out of it in the gallery. Looks like it'll help the rest of us, and any new viewers, figure out how they're going to do their install.

Regards,

DWD

Ed told me about his baffle arrangement, and it pretty much matches yours. My brother peeked in on my prgress today and said that the air exit needs to be at least as large as the inlet otherwise there will be backpressure. So I'm planning to make the return air a bit larger than that. Make sense? Ed? Matt? Care to share your thoughts on this?

As for the door, I agree. Hinged at the top seems a real headache to me. See my next post for more info.

Jameel,

You have been busy! Looks like everything is moving right along. I would say to go with a standard door on the front whether it is pre-hung leaun door or made yourself and return with baffle on the side. It's just much easier to open the door to check and empty dust bin. Depending on what you are doing you could easily fill it up pretty quickly. We empty ours once a day with fine mdf dust. Make it as easy on yourself as possible.

As far as noise concerns I think you will be suprised at how much the batting will help.

Matt

I decided to make the entire front of the closet one huge door, that way I will have plenty of space to empty the bin and work on the DC. See my next post for today's progress! Thanks for your help Matt.
 
Instead of using a premade door, I decided to make the entire front wall of the enclosure a door in itself, that way I could have plenty of room to work on the DC and empty the chip bin. Here's a pic with the rough framing in place.

DSCN4926.jpg

Here I've stapled screen to the inside of the enclosure and and filled the walls with fiberglass batts.

DSCN4928.jpg

DSCN4930.jpg

For some reason my opening ended up being out of square. So I decided to build the door/wall in place. Great application for pocket screws! I could attach the cross members from the inside of the door instead of toenailing or screwing from the outside into the end of the cross members.

DSCN4931.jpg

The left stile of the door/wall clamped in place.

DSCN4932.jpg
 
Here's the finished door with my black foam strips (3" thick) in place.

DSCN4933.jpg

Closer shot

DSCN4934.jpg

With the door open

DSCN4935.jpg

I skinned the door with a layer of Homasote. Never noticed this stuff before at Menard's, but it was advertised as sound dampening, plus I've heard it mentioned a few times while researching this project. It's recycled newsprint, fairly lightweight, and seems like a nice "dead" surface. It's not very durable though, so I covered this with a piece of 1/4" melamine coated MDF I had left over from a couple kitchens I built a few years ago. Instant paint!

DSCN4936.jpg

Here's a pic with the door shut.

DSCN4937.jpg

I was hoping to finish today, but decided to call it quits at about 6:30. I was really anxious to hear the sound difference. I couldn't resist the temptation, so I fired her up and closed the door almost all the way (if I had closed it completely my fiberglass batts would have been blown out). The difference was very noticeable! And this with the door open partially and no hard surfaces on the insulated walls! I'm really excited to get this buttoned up tomorrow and really try it! It's going to be great! I know it!

One more thing, I'm assuming my return air baffle must equal the area of the intake? Otherwise I'll get backpressure, right? What are you guy's thoughts on this?
 
Last edited:
Outlet Area

Outlet Area

Hi, Jameel,

Wow! You have been busy!

Actually, I think I'd shoot for a larger sized opening for your outlet. The flow through the pipes is expressed in CFM, and I'm going to assume no compression, and ignore the heat added by the motor & fan.

The equation is CFM = velocity, in ft / min, times cross sectional area, in sq. ft.

Thus for a given CFM, to halve exhaust velocity you'll need to double the area.

As applied to the CV 1800, from admittedly fuzzy memory, the CFM is about 1500. Inlet I assume is the "standard" 6 inch diameter pipe, or about 28 1/4 sq. inches, or 0.196 sq. ft. Solving for velocity, you get roughly 7640 ft / min. Speedy, but not Mach 1. If I did the conversion right, its nearer Mach 0.1

But still, the point remains it is moving right along, and may contribute some airflow noise. However, this will be one of those compromise situations. Do you maximize noise absorption of the fiberglass batting by keeping the exhaust area as small as possible, or do you reduce air passage noise by increasing exhaust area, at the possible expense of decreasing some of the noise absorption of the cabinet?

It might be reasonable, given the above, to start with a small exhaust, maybe 1.5 times the inlet area, then enlarge it if necessary or desirable. Its easier to make the hole larger, I think, than, once cut, smaller. Like table legs, the old joke about cutting them off three times and they're still too short.

Regards,

DWD
 
Jameel
We used a return air vent of 14 1/2 (standard distance between studs) x 24. I put a baffle in front of the opening with an opening at the bottom so the air has to flow around the baffle and the sound can't go straight through. It is very effective. I'm sure it will work well for you. Great job so far.

Ed
 
DWD,

So theoretically if my outlet is the same size as my inlet, say 6" circle, the air will be exhausting at the same speed as the inlet is sucking. That seems really fast. I'd like it to be gentler, so I guess I have to bump up the exhaust size.

Ed,

I think I have your louver setup right. Does it look like this?

baffle.jpg

baffleunder.jpg

louvervent.jpg

If so, how large is the hole at the bottom of your baffle? How fast does the air come out? I'm not sure how often you check this forum, so I'll probably call later this morning. Thanks for all your support and help. Really appreciate it.

Follow-up: Just talked to Ed and got the info on the return air requirements. He said to make it at least twice as large as the intake, around 50 sq inches. Same as DWD's info. I'm going to change the baffle design from the drawings in this post and will get back with photos and sound tests this afternoon if everything goes right this morning!
 
Last edited:
Today I completely finished the closet...

...started the morning off by putting the remaining Homasote on the walls

DSCN4938.jpg

then I removed the foam from the bottom section and cut a hole for my return air vent. Could have been smaller, but I had already this in the shop, so I used it. It's 14" x 24"

dscn4942.jpg

Then I started making the baffle from Homasote (why not?) and to my surprise it held screws in the edge pretty well. We'll see how it holds up. It will only have air rushing past, so I'm not too worried. :)

DSCN4944.jpg

The baffle with grille in place. I'm keeping the side opposite the blower and the bottom open for air flow. Arranging the baffles this way blocks more of the noise from up high.

DSCN4945.jpg

Here's the completed baffle.

DSCN4946.jpg
 
More pics

More pics

View of the baffle from the open side. Plenty of air space, nevertheless the air rushing out of this thing will kick up any dust on the floor outside the enclosure. Of course, once the system is up and running, there will be NO dust here. (Yeah, right!) Good impetus to keep the shop clean.

DSCN4947.jpg

And with the foam back in place, cut to fit

DSCN4948.JPG

Weather stripping along the door "jamb"

DSCN4952.jpg

And along the bottom

DSCN4955.JPG

I'm keeping the door/wall shut with two toggle clamps. I was going to buy a couple trunk latches, but they are not adjustable. The toggles were more money, like triple, but I can adjust the closing pressure for a perfect seal.

DSCN4956.JPG
 
The finished closet.

I was hoping to post some spl readings with my brother's meter, but he sold it last week!! I was looking forward to this all week!

The closet works great. With the blast gate shut (no air flow), I can barely hear the thing, maybe even quiter than a washing machine or dryer! With one gate open though, its gets much louder right at the gate, but still much quiter than just out in the open. Heck, it's even quieter with the door open than it was before when it was just sitting in my shop.

I'm guessing once the ducting is run and hooked up to a machine, this rushing sound will be even less noticeable.

Without investing in a sound meter I think the best way to share the sound is to make some recordings. That should give a decent idea of how successful I was. I'll try to make that yet this evening...

Thanks again to Ed Matt and DWD for your input.
 

Attachments

  • DSCN4961.jpg
    DSCN4961.jpg
    26.1 KB · Views: 2
Jameel,
Thanks for sharing your work so far. I'm sure there are many people who will benefit from your experience. I will be looking forward to hearing your recordings. You are right about the sound of the air. As you complete your ducting, it will be less at the machines. However, if you have any machines with a single 4" port, it will be louder than the air sound from a 6" line. I measure one of my 4" pickups at 82-84 db. That's louder than the cyclone running with the door open.

Thanks again,

Ed
 
Recordings...

Recordings...

I had a chance to make a recording this evening.

Click here to download it: http://www.khalafoud.com/media/ClearVueSoundTest_Jameel.mp3

Four different "tests" on this one.

1. Closet shut and one blast gate open. That one blast gate gives a lot of noise, as you said, Ed.

2. Closet shut and NO blast gates open (no air flow) This one is really quiet. You can also hear a little clunk after the DC starts. Thats my trash can getting sucked up by the DC and compressing a little. Powerful!

3. Blast gate open and closet open. This is much louder. But even the partial closet (door open) cut back the sound quite a bit from just having the DC sitting in the corner of the shop.

4. My Delta Unisaw with 10" blade and standard insert.

Take a look at this image from my audio program. I'm not good enough with this program to tell you anything about decibels and such. This is a pro-level program with all kinds of frequency analysis and such, I'm just not edumacated enuf to decifer it! :D But you can clearly see the four different tests (the taller areas). The third one with the door open is obviously MUCH louder than the others. Interestingly, the Unisaw is about the same level as the DC with one gate open.

Overall, I'm really happy with the results. The noise is MUCH more tolerable and once my ducting is in place I'll have a much better feel for how successful the whole project was. I may pick up a decibel meter to get some hard numbers, that would be very interesting.
 

Attachments

  • clearvuesoundtestwavimage.jpg
    clearvuesoundtestwavimage.jpg
    88.9 KB · Views: 2
Very Nice!

Very Nice!

Jameel,

Very nice and very speedy work! Now if only I could get off my oversized duff and do likewise, but that's another story.

I took the liberty of using some capture software whilst playing your recording, as I couldn't find a way to directly d/l it to my local machine. Then while playing it in the basic Windows Media Player I also viewed it with that GSpec software someone in the other noise thread recommended. I'm going to try to add the images, which I've converted to JPEGs. The numbers in red and green in the upper right corner of the images show the Hz of the peak the cursor is identifying.

Now, I'm not convinced I'm using GSpec properly, for starters. It seemed to want to identify peak noise in a rather low band. Unfortunately, my trial version of the tone generator, also recommended in the other thread, expired, so I don't at present have anything to compare what GSpec is telling me to a "gold standard".

But that said, it appears the machinery generates peak noise around 66 Hz. For comparison, the Unisaw's peak is at 78 with another peak, nearly as high, peak around 140 Hz. Note in your recording there is a definite ring, probably from the blade, audible as you turn the Unisaw off. This snapshot was taken before that event, so does not include that peak. But if you go d/l GSpec, you'll see what I'm talking about.

I'm surprised, actually, at the relatively low frequencies, and as I said above, am not convinced I'm using the software correctly.

Let me also take this opportunity to urge you to add your efforts and documentation to the gallery. For two reasons. First, you demonstrated how quickly one can build an effective noise containment closet, and second, I think that's the best illustration we have to date of a return air vent and baffle.

Regards,

DWD
 

Attachments

  • Blast Gate Open.jpg
    Blast Gate Open.jpg
    11.2 KB · Views: 1
  • Blast Gate Shut.jpg
    Blast Gate Shut.jpg
    10 KB · Views: 2
  • Door Open.jpg
    Door Open.jpg
    14.1 KB · Views: 1
  • Unisaw.jpg
    Unisaw.jpg
    10.8 KB · Views: 1
Nice work Jameel. I've installed my DC outside my shop. I have it mounted to my outside wall which has 6" insulation with 5/8" siding on the outside and 5x8 drywall on the inside and it is still noisy. I'm going to use some batting insulation with screen to quite it down. I won't get to it until next spring but if I remember I'll record some before and after audio like you did. Nothing like hearing the difference!
 
Jameel
We used a return air vent of 14 1/2 (standard distance between studs) x 24. I put a baffle in front of the opening with an opening at the bottom so the air has to flow around the baffle and the sound can't go straight through. It is very effective. I'm sure it will work well for you. Great job so far.

Ed

Hi Ed and Jameel,

Can you tell us where you purchased the return air vent ?

Thanks,
Erick
 
Back
Top