New CV1800LH Installation

Chieftain

New member
I finally took the leap last week and ordered my CV1800 system. UPS says they will deliver it this coming Friday (July 18 2014) and I will proceed to start installing it.

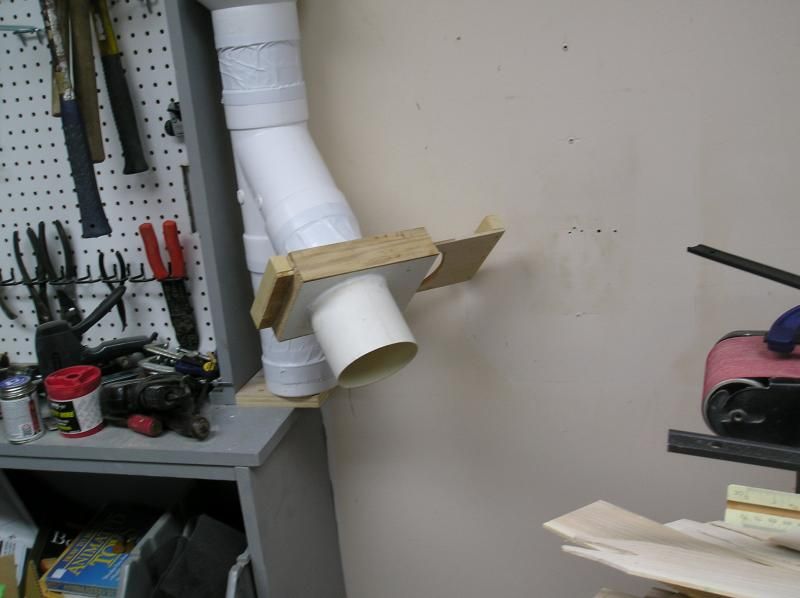
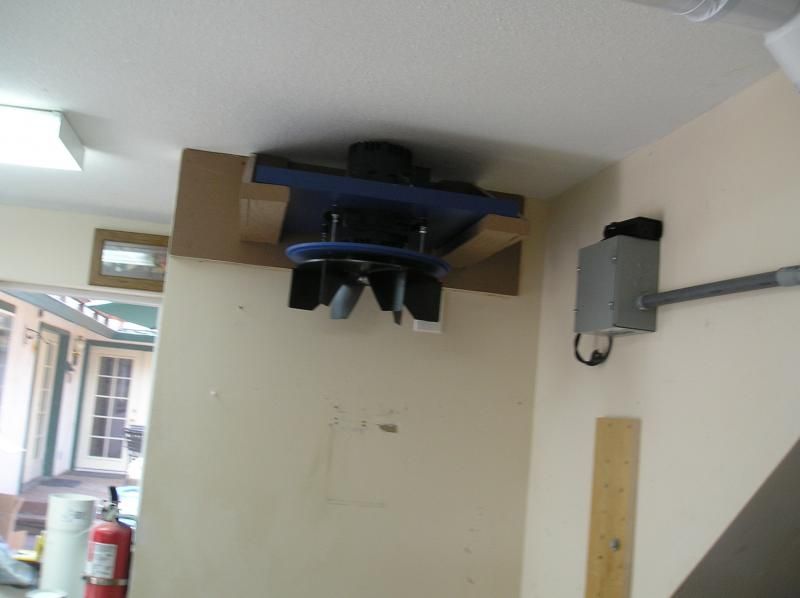
I have not seen a complete installation thread up here so I decided to start one. I plan to photo-document my whole system installation as I go along. I already have my ductwork and rough electrical complete, and will post pictures of what I have done along with explanations as I go.

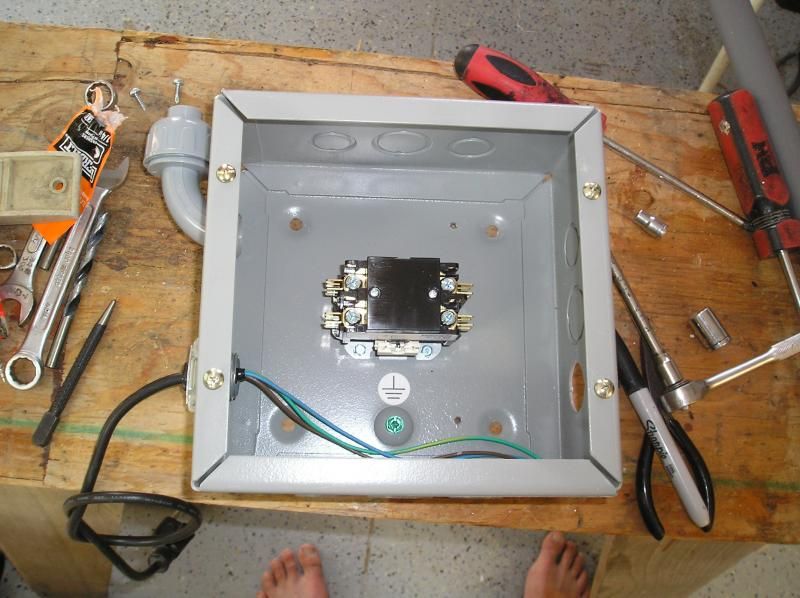
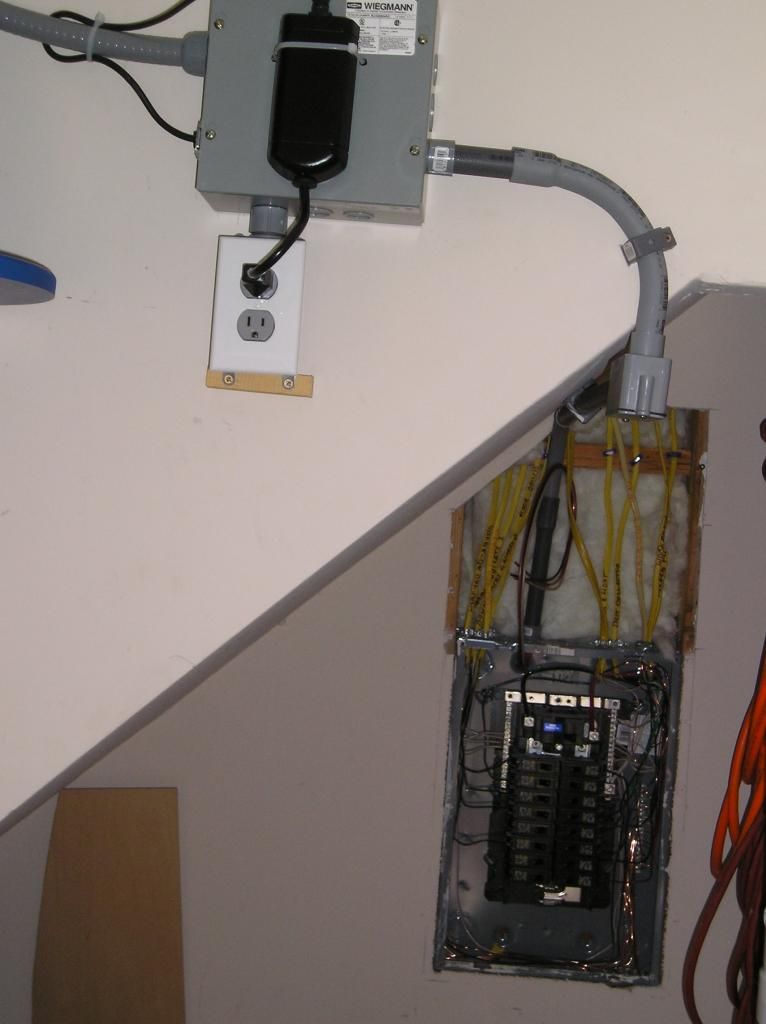
I am installing this system in my workshop that I built here on my property two years ago. It is a two story building with about 350 sq feet on each floor. Its built on a monolithic concrete foundation, and is heavily reinforced, has 2x6 insulated walls, and generally thoroughly sound proofed by design. We're in a residential neighborhood and I knew it was prudent to do all I could to keep this shop as quiet as possible. The second floor is storage and my studio while the whole first floor is my workshop. I have a solid electrical system that is well grounded and surge protected.

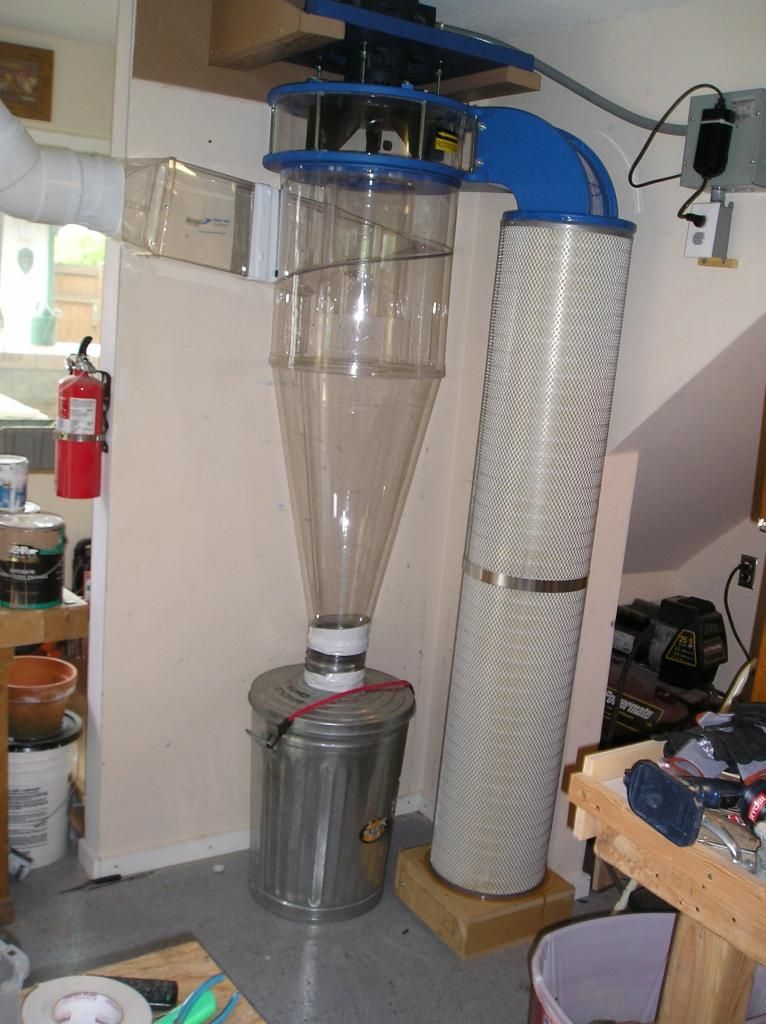
Originally I started out with a portable 4" bag style dust collector, and it worked well enough to get me through the first 2 years. Last Fall I caught a great sale on a 14" bandsaw I had lusted after for years and got it installed. It was clear from the beginning that the dust collector I had was completely inadequate to service my saw. I was doing quite a bit of resawing and even with the collector running, I had a cloud of fine dust in and around the bandsaw constantly.

I also built a vacume cabinet to mount my two sanders on. I built it to hook into the 4" dust collector hose, and each sander has a 2 1/2" short hose and blast gate. It works reasonably well but the fine dust it produces does not stay in the collector, whose bag is rated at only 30 microns.

The environment in my shop quickly deteriorated to the point that even with a good dust mask on at all times, I was having respiratory problems this Spring, and decided to shut down operations until I could upgrade the dust collection system.

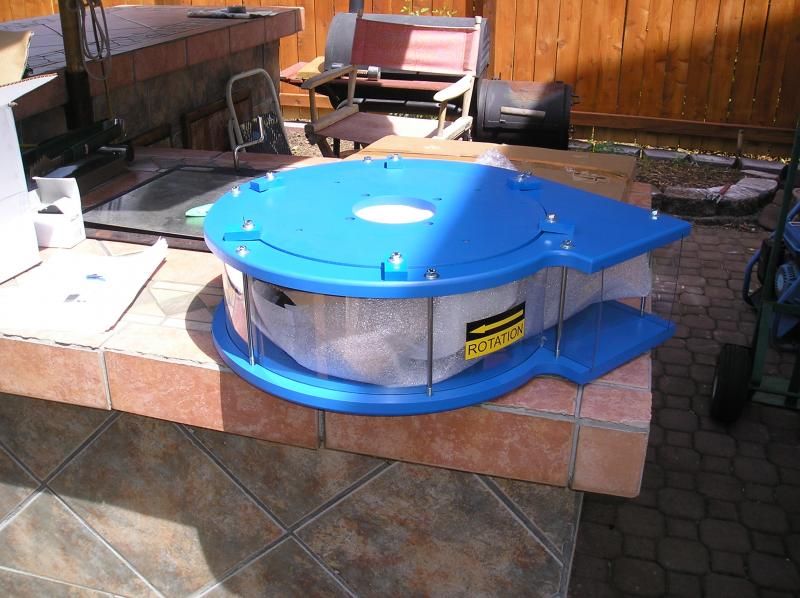
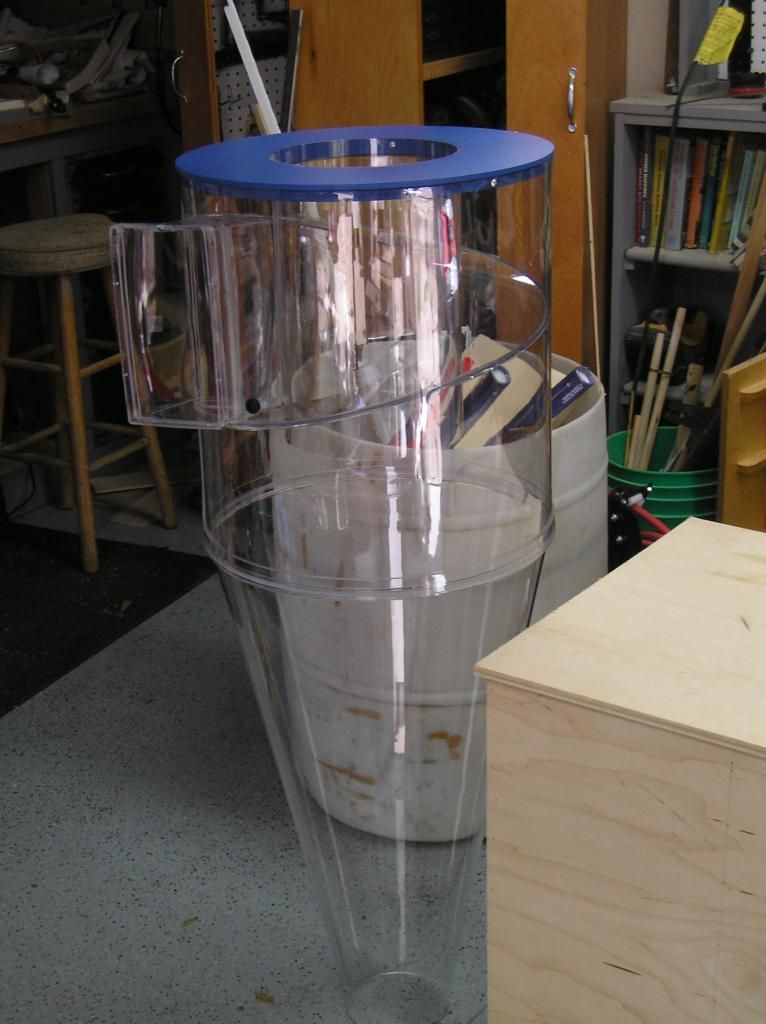
I did a lot of homework on this. I have read all of the reference materials that Clear Vue has linked to, and all of it helped me tremendously to define the problem and develop the solution. The CV1800 is the solution.

I found the only other similar system out there is made from steel, and they warn you up front that the minimum shipping on it is $450!! The shipping from South Carolina to here in the Pacific Northwest was only $130...much more reasonable!

In any case, I am well along on the installation already and will be posting several more entries this week to show how I did my ducting, electrical system, and even some pictures of the trashcan mods I am doing today. Once the collector gets here I will thoroughly document exactly how I put it together. If anyone can benefit from having this information in one place, then it will be worth the effort.

Cheers!

:D
 
I started this project by laying out a rough sketch of my ducting. I planned on using 6" PVC for the mains and neck down to 4" drops for tools. I have several copies of the original plans for the shop so dimensions were not a problem. I estimated what I needed and headed out to the local plumbing supply to see what they had.

I used what is called Drain and Waste pipe. It is easy to identify as it is molded with D&W on the pipe and fittings. 10' lengths of pipe are standard and they come with one end socketed to accept another length of pipe. Drain and waste pipe is not rated for pressure. It is used for drain fields and septic systems, so it is designed to support several hundred pounds of pressure from being buried in the ground. It is perfect for a vacuum system.

You need to know what you are looking for because if you live in an area where there are not a lot of septic systems, your local plumbing supply house may try and sell you Schedule 40 PVC, which is decidedly not what you want. A 6" Wye in D&W runs about $21 where a Schedule 40 PVC wye can run $90 a pop. Make sure you are getting what you really want.

As it turned out, my local Ace Hardware store was an excellent source for fittings. The plumbing supply house had a few D&W fittings, but they cannot order less than whole case lots, and their minimum order to their supplier is $8,000...so I had to look elsewhere for the big fittings. Ace Hardware carries all kinds of the right fittings in their computerized stock system, and they can order any quantity you need. I had to wait a few days for the last pair of 45's, but they really came through to help me finish the ducting. All in all I have a couple of hundred bucks in the ducting, it looks good and will last a long time.

I used perforated metal strapping for my hangars. I bought a box of good structural screws with shoulders and washer, and drove them into the joists in the ceiling. To hang the pipe I drilled a pilot hole in the pipe on each side to fit a screw that holds the straps tightly to the pipe. The threads are small and tight and will never leak.

The 6" D&W pipe fittings come with a 3" socket that the pipe fits into very nicely. When I cut a length of pipe, I marked the end at 3" so I knew when I had full penetration. Once it was seated, I used a high quality air conditioning duct tape to seal every single pipe joint. No screws are needed to hold the pipe together. Once you tape it up it will never leak, and when you are ready to make a change to your system, add a drop or change a tool's location, just remove the tape.

A few pictures....

4thofJuly2014011-1.jpg


This is the duct and drop for my bandsaw. I used 6" from the floor up and over. The duct is capped and taped on the bottom, and that carries the weight of the whole drop. There are 2, 4" wyes with blast gates, the upper for the bandsaw and the bottom for a cleanup.

4thofJuly2014010-1.jpg


The next drop is on the back wall of the shop and is intended for my sander vacuum cabinet, and the router table. It rests on a 4" cap that carries the weight nicely. You can see my experiment in making my own blast gates...we'll get to that in due course.

4thofJuly2014008-1.jpg


That's a really good view of how the drops tie in together. Notice there are no 90 degree turns that do not involve a pair of 45 degree fittings. I fitted this all together as I went, loose fit and marked everything for the drops, then taped it all together on the patio where I could check angles.

You need some room to work as you are hauling around some large awkward pieces of pipe with fittings attached.

When I first started serious planning for this project I decided to use some scrap material I had and made a couple of blast gates. I used them to help me decide where the best place to put the drops as, as well as how they would fit. I have since replaced them with the PVC blast gates that my local Woodcraft store sells. They stock a fair amount of vacuum system parts, but once again you need to know exactly what you are looking for.

I am also not a subscriber to the belief that one need ground non-conductive PVC ducting. When I built the shop, code required that I install a 25' long piece of bare copper wire as a ground for the building. It was wired onto the rebar in the foundation before we poured the concrete, and is the dedicated electrical ground for the service panel that feeds the circuits in the shop. All of my outlets are grounded and protected by ground fault interrupters. All of my woodworking machines are therefore grounded as will be all metal parts of the cyclone itself. With copper being so insanely expensive these days I see no need to wrap my ducting in wire that does absolutely nothing.

I have plenty of pipe for the final connection and will wait to see what fittings I need before I head down to Ace. That's where I am at the moment with the ducting...three more days till the cyclone gets here.......

:D
 
Just a quick update as its late Tuesday night.

The system arrived Friday and I spent the weekend getting it assembled and ready to go. I got it wired up on Sunday afternoon around 2, after getting the filters and ducting hooked up, and gave it some run time.

WOW! Incredible amount of suction and air flow! This thing will indeed such the proverbial golf ball through a garden hose! I still need to get a couple of fittings to hook up the rest of my power tools, but the bandsaw was all the proof I needed. The air flow through it is amazing, and not one bit of sawdust escapes!

I can safely say I would recommend one of these systems to anyone with a serious wood shop. This is an incredible value, and a finely engineered machine. I was very leery about spending this much money on something I had never seen up close, or put my hands on, but after seeing it in action I unconditionally recommend this system!

Great product Clear Vue!

:D
 
Busy couple of weeks! I've been getting the shop put back together and in operation again. The new cyclone is quieter than I thought it would be. It has more low frequency sound, but less high frequency, and that's the one that carries. My neighbor across the street thought I had built an air raid siren the first time I fired up my thickness planer. It's far noisier than the cyclone, and the cyclone is quieter than the old bag collector.

Let me just post a few pictures and comments. I have quite a few to put up so let's get to it....

Cyclone006.jpg


Fresh off the UPS truck. The filters came later that day via Fedex and that made two more large boxes. The system is very well packaged in custom boxes with good padding, and thank God no plastic peanuts! The Leeson motor is the heaviest item and comes bolted to a plywood base inside the box.

Cyclone007.jpg


That's the blower assembly with the impeller packaged inside of it. Very nicely done!

Cyclone010.jpg


The first real rush is when you unpack the cyclone body and realize just how big this thing really is....


:D
 
Cyclone008.jpg


Trust them when the instructions tell you to get some help putting that assembly up on the mount. Once you have the impeller on it, torqued and ready to go it is not only heavy but incredibly awkward as well. There is only about 3/4" clearance between the top of the motor housing and the bottom of the ceiling, so plan accordingly.

Another note, install the electrical pigtail on the motor before you put it up there. That will save you the effort of taking it back down later because the box is not very accessible once it is installed....

Cyclone016.jpg


I'm very comfortable doing my own electrical work, and this is fairly basic stuff. Here is the control relay mounted in the 8" electrical box I picked up at Home Depot along with a length of 3/4" plastic conduit and a few fittings.

Cyclone020.jpg


The electrical panel is on the center of the back wall of the shop underneath the stairs to the second floor (my studio...). You can see I opened the wall above the panel to gain access to tun the new 220 Volt service. I later made a panel out of 1/2" MDF and screwed it into place to close up the opening.

The black box hanging on the front is the remote control unit. The Instructions say Ace Hardware carries a unit, but they discontinued it several years ago. I found this one on Amazon for $20. It is used to control outdoor Christmas lights and such, and is rated for 20 Amps. Since all it will be doing is energizing a small 110V coil, it is perfect.

I tapped one of the hot leads coming into the box to energize the 110V outlet box mounted underneath the 8" box. The remote plugs into that outlet, and I wired a simple 3 prong electrical cord to the coil inside, so that it simply plugs into the remote controller. The keypad is as small as a car remote and I have it hanging from the ceiling in the middle of the shop where it cannot get lost. Simple On/Off buttons and it works great!

:D
 
dustcollector002.jpg


So there it is, completely installed. Notice the cleanout box underneath the filter stack. I used a good quality, heavy duty heat and air conditioning duct tape to install all of the ducting. Don't cheap out here, but the good stuff even if it is $15 a roll. It's important to use the right stuff to prevent leaks.

I still have to add a couple of hangars but the ducting is basically complete once its adapted into the cyclone. I simply cut the pipe so it fit into the opening of the cyclone body then just taped it in place. Strong and no leaks.

I am going to put up a different thread about connecting to power tools, the bandsaw in particular. The Clear Vue Cyclone has made my bandsaw into a completely different machine.

There simply is no dust problem like there was before, and if I do anything in the shop that creates dust in the air, I just open all the blast gates and turn the system on for several minutes. In fact one of the first things I did was exactly that....left it running while I blew down the shop with compressed air. The cleaning is ongoing but I simply do not have a dust problem now.

:D
 
I found your installation description and photos very helpful thank you Chieftain. It is reassuring to read that not only is it very effective as a dust extractor but also that the sound level was less than you expected. Can you tell me please what the height and capacity of your collection bin is please? Thanks.
 
Ho Woodie! Thanks for asking...its been several years since I wrote all of this and its interesting to review how I started out.

I used a 30 gallon galvanized trash can as a bin. I cut a hole in the top to fit a 6" metal air conditioning duct nozzle which I installed from the inside with lots of silicone sealant and pop-rivets. I also caulked all of the seams inside the can itself so it cannot leak air, even around the rivets that hold the handles on. The lid is permanently attached to the bottom of the cyclone with the 6" flex hose provided. I installed 3/4" wide self-stick weather stripping around the inside of the can lid to make sure it seals against the top lip of the cab. To empty it, I just lift the lid on one side and slide the can out from under it. It works very well.

I cleaned out the exhaust filters really well this spring. I opened the clean out box they sit on, put the hose of the shop vac in the opening, then started gently tapping the filter all over the outside. I also took my airhose and blew compressed air back through the filter to dislodge all of the fine dust it had collected inside.
 
Hi Chieftain! I am delighted that you read my question and I appreciate reading your helpful reply. Sounds like thorough caulking, pop riveting and also weather stripping inside the lid ensures a leak free can. Sounds too as if the filters will be functioning efficiently after the blow out you gave them this spring. Thanks for providing such clear photos in your installation account. I'm also curious to know just what you were able to use in the way of ducting at the intake. It looks as if there is a 22.5 degree elbow then a 6" diameter to rectangular transition meeting the cyclone inlet proper. It seems as if you didn't require 5 or 6 ft of straight ducting. I am at the early stage of planning for my extraction system and the ducting has to pass through a wall and then turn at a right angle into a left hand intake cyclone.
I
 
Back
Top