Blower modification...

Bert,

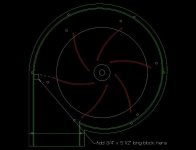
I am unaware of any modifications to the blower impeller (I agree that would be a potential hazard), but as you will find in John Samuel's post in this thread and on Bill Pentz' website, most of the noise emanates from the exhaust side of the blower. One modification that has proven effective is to add a small block of wood inside the blower exhaust mouth as shown in the attached picture (repportedly, this drops the sound output by 10 dB). A second method is to use a 10 foot length of 10" insulated HVAC duct (the type used for residential heating distribution from mains to registers) between the blower mouth and your filters or to the outside if you discharge directly outdoors.

Hope this helps.
 

Attachments

  • Noise%20Reduction%20Blower.jpg
    Noise%20Reduction%20Blower.jpg
    33 KB · Views: 3
Thank you

Thank you

Thank you guys for your help.
I greatly appreciate it.
I already built a shed around my CV and I installed a sound barrier.
Now I have to install the piece of 3/4" wood inside.
(Thanks to the person who sent me the drawing)
Can you install it just reaching through exhaust opening or do yo have to take the thing apart?
How to do hold the piece of wood inside the housing? Wood screws?
My CV is right against the wall, if I use screws I will have to move the all thing to put the screws in and this is going to be a problem as I have to disconnect the duct going to the shop. Could I may be glue it in?
Again , thank you all for your help. :D
Bertrand
 
Bertrand,

Personally, I would leave putting in that 3/4" piece of wood until everything else had been tried, because it costs you a little airflow. I don't have one in my blower, and my noise levels 10 feet from the blower is 62-63 dB. I measure noise levels using a free mobile phone application ... it works a treat.

The great majority of the noise comes from the exhaust. Any significant noise reduction should start there.

This is easier to do if you are venting outside and are not using filters. Are you using filters?

My noise level was 97 dB before I started ... VERY LOUD! Two layers of 10 foot long insulated HVAC ducting on the exhaust (one 8 inch and another 12 inch over that) dropped the noise to about 66 dB. A 10 dB reduction halves the noise level. Insulating the blower was worth about another 4-5 dB.

That little piece of wood is unlikely to give you the sound reduction you can achieve by focussing on the exhaust. Kill the exhaust noise, and it is likely all will be fine.
 
Bertrand,

Could not see the last 4 pictures at Lumberjocks, so could not see the filter installation.

Yes, this is the kind of insulated HVAV duct I used for the exhaust. http://www.homedepot.com/h_d1/N-5yc...nsulated+hvac+duct&storeId=10051#.UTM8VaJmiSo

I used 8 inch at first, and then pulled 12 inch duct over the top of the 8 inch duct, to give me two layers. The size of the second layer is not important, so long as you can pull the smaller duct through the larger one.

Do you direct the air exiting the filters back into the workshop? If not, you do not need filters; you can exhaust to the outside air. Americans tend to use filters so they don't pump all of the warm air out of their workshop in winter. I live in Brisbane, and we don't get snow or extreme cold (a bit like Florida or LA), so we vent outside.

Either way, the trick seems to be to have 8 to 10 feet of the insulated HVAC duct as the primary exhaust. If you can do that, you will get a significant drop in noise. A muffler would probably help reduce noise even more, but once I got the noise below 65 dB, I stopped work because most of my other machines are noisier than that.

Can you repost the pictures from Lumberjocks so we can see them? It looks like an interesting installation.
 
Me agsaain

Me agsaain

John, on Lumberjocks you need to keep clicking on "show previous replies" or on "show all replies.
Have great day.
Bertrand
show previous 15" or show all replies.
Tahnk you for your help.
Bertrand
 
Bertrand,

Although John Samuel recommended adding the stick as a last resort, you will need to do a fair amount of work to get it in after all of your ductwork is in place. I made mine from a piece of 3/4" square white oak that was about 1/16" longer than the distance between the two blower sides. I loosened the bolts and tapped it into place and then re-tightened the bolts. Easy solution and frankly, I don't think there is that much loss of blower output (gut feeling, no data).

And BTW, your exterior closet is a good candidate for a bin sensor system so you don't overfill your dust bin and pack your filters with sawdust and chips.
 
I know some of this is old, but was interested to see if any updates are available regarding potential enhancements.

Erik mentioned that your current draw dropped following addition of the ring and Allan says his current draw went up. Typically, more current suggests more work by the fan.
Any comments?

Some addition information after a few hours of use of the new setup.
1- I use about 10-15% LESS current (for the same configuration)
2- The dustpattern on the back of the vanes has changed (see photos) I can only suppose that there must be less turbulance so the fine dust can now stick to the vane. (The photo after is the one with the plate fitted).
It seems there is still room for improvement - there are still spots that catch turbulance.

I added a similar ring to my blower housing also Erik. My amp draw increased with the ring and I noticed more suction at my machines. Mine is larger than the impeller but I did it like that to try and close of the gore point to limit the amount of air that might get recirculated. As a side note the exhaust on my blower is 55.5 sq. inches.

Erik, Did you try any other changes? I finally got my CV hanging and mostly piped in. I will be tracking my own performance numbers over the next few months.

RMason

Yes I want to make some more adjustments
I would like make the disk smaller: the same size of the fan.
The main idea is to get the air through the fan straight out of the inner tube. Ideally I would have the fan fitted with a bottom plate (with a 9" hole in the middle) and have the inner tube right up to the fan, at the same time I would increase the size of the blower housing output to reduce the back-pressure.

I do not think increasing the size of the added disk is any good. It would just decrease the output size and add to the back-pressure.

The rounded corners on the outside of the added disk are to get the air smoothly from the fan out into the blower-housing.

I will try a few different configurations as soon as I can get the right instruments to measure the CFM, SP and Amps. real soon now..:)

I will keep you posted

Erik
 
When I get a chance to resize the picture that goes with this chart I will post it but these are the readings I got.

I used the following test equipment for me to take readings on my home built Pentz design cyclone.

Dwyer 471 hot wire anemometer, a UEI EM151 digital manometer, and a basic analog clamp-on ammeter but I substituted my Sperry digital clamp on amp meter.

My system is home built from plans on Bill Pentz's website. It is a 20" diameter cyclone with the Leeson 5 hp motor turning a 16" backward incline steel impeller. It has a 5" x 10" rectangular intake and exhaust into 2 seasoned Wynn 9L300 filters. I did not clean the filters before taking these measurements.

Blastgate-----SP-----FPM------CFM------Amps---------Tool

All closed-----14.9"---700------245-------11.8---------None

All open-------3.6"---6250-----2192------18.5----------All

#1-----------10.9"---3400-----1192------16.5---------SCMS

#2-----------11.5"---3125-----1096------16.3--------8" jointer

#3-----------12.4"---2900 ----1017------15.6--------Ridgid TP1300 Planer

#4-----------6.21"---5600-----1964------17.9--------End of duct work

#5-----------10.2"---3600-----1263------16.9----------Table saw

#1 & #5------6.51"---5200-----1824------17.8--------Table saw & SCMS

#2 & #3-------8.3"---4300-----1508------17.4--------8" jointer & TP1300 Planer


These readings are with the machines connected like they are normally used. Number 4 is an end of duct run that I thought I might use one day to expand.
 
Back
Top