6" Flex over 6" S&D

Anyone try this?

Anyone try this?

Tried all the methods in this thread and only ended up with shredded fingers.

Took a 6" coupler and the Wynn flex slipped right in. I've got it connected to my table saw but not tested. I'm thinking that it would need to be fixed with a screw or two and either taped, caulked or both.

Took about 5 seconds to slip the flex in. There's a local store that always has couplers in stock or can order them in a few days time.

Hope this works...
Burt
 
Bell end of pipe

Bell end of pipe

I have used the bell ends of 6 in pipe to do exactly as you describe and has worked for me. Not all of the connections were made this way but there were a few places I where I could use them and did. Stuffed pipe in and taped and done although caulk would look better and prolly hold as well too.

Matt
 
One other reason I like this method is it allows me to change an end.

Example:
I have a 6" flex drop to my lathe. I can easily change out the dust hood and connect some longer flex to use as a vacuum. Also lets me move my band saw around without worrying about ripping the flex out.

But the big bonus is it's so easy to get on and off. I did end up putting 4 screws into the coupler because of the usage. Want to make sure it doesn't come off.

Burt
 
Another twist on 6' flex to 6" PVC

Another twist on 6' flex to 6" PVC

Gents, this is my first post but thought I'd share something that worked great for me when I got so frustrated trying to connect flex to PVC for my Clearvue system (it is an amazing machine, by the way).

I used 3034 pipe (the aqua color stuff) for my flex connections. I cut a short piece (4") of PVC on the band saw or table saw, taking care to keep the ends square with the pipe wall. Then I went to the router table and installed a 1" straight bit, and removed about a 1" high collar around one end of the 3034 pipe to a depth of about 1/8" all the way around the end of the pipe. You have to take off a little at a time using a couple of passes and sand off the sharp outside edge on the bottom of the pipe. When finished, the Wynn 6" flex hose fits right over the end (it's tight but works well).

The 3034 pipe is thicker than the 2724 pipe, which allows the exterior removal. It's thick enough after modification to still have plenty of strength to support clamps, and the opposite end of the pipe still fits the blast gates that come with the cyclone and all PVC connections (same OD as the 2724 pipe). With due respect, this method certainly was easier for me than heating, boiling, etc., and more successful than swearing.

I've had similar success connecting 4" flex to 4" black PVC for my smaller machines. Hopefully it will work for you, too. Scott
 
You're talking about reducing the outside diameter of the first 1", so you have a sharp shoulder where it meets the full diameter section? Can you elaborate on the routing? Did you make up a jig?
 
Simple PVC Adapters

Simple PVC Adapters

Hi everyone I follow the CV forum regularly and keep track of various threads. This one is interesting because it addresses an issue each of us has to deal with one way or another. I have tried several methods with vary levels of success. I initially started by trying to get the Wynn flex over the PVC pipe but this was just to much work. I then tried cutting multiple slots around the circumference at the end of the pipe which allows the end of the pipe to be compressed slightly by the thickness of the kerfs so it fits into the end of the flex. This worked OK but still was not great. In some areas I just used the bell end of the pipe as a receiver for the flex using silicon and tape as sealer. This worked OK but still was not a good solution for every connection.

After getting most of my 6" flex up using a combination of these methods I realized that I had the same problem with putting the Rocklers 4" flex on 4" PVC. I typically use two 4" connections for my general tool outlets from the 6" mains for my portable tools (Router table, planner, jointer, etc.) so I had several to do. Here is what I finally ended up doing which works great. I simple cut off to ~4" lengths of the 4" pipe. I measure the inside and outside diameters of the pipe and calculate the difference. I then go to my band saw and make two cuts along the length of one of the pieces to remove the difference in the two diameters from one of the pipe pieces. I verify that this piece fits tightly inside of the uncut piece and tweak the cut if necessary to get a reasonably tight fit. I then use thick CA glue (Cyanoacrylate glue ) to glue the cut piece back together for a smaller diameter and then glue it into the end of the other short piece to from an adapter that fits standard 4" pipe adapters on one end and allows the 4" flex to easily be attached to the other end. It works great and since I am using this for various portable tools I just put the standard 4" slip-on connectors from Rocklers onto the 4" flex hoses and they slip right over the smaller end of the adapter. I know it sounds like a lot of work to make these but the whole process is very quick and easy for several reasons. Simple cuts, easy gluing since the smaller diameter is held in shape by the larger diameter piece it goes into, the CA glue is fast drying and very forgiving. Note the fit does not have to be perfect since the CA glue easily fills any minor voids between the two pieces. I do use the CA glue accelerator to make it set even faster. I have been using these adapters for awhile and they appear to be rugged enough for the job.

Back to the specific point of this thread. I have tried this method for reducing the end of a 6" PVC pipe by inserting and gluing a small adapter piece inside the end of the 6" pipe that receives the 6" flex and it works well also. Note, however, that not all 6" PVC pipe is the same thickness so it my not work as well in some cases. The picture shows an example of the 4" adapters to the planner and the 6" pipe going down from the wye has the 6"adapter piece in it. Perhaps something like this would work for your setup.

http://www.gallery2.clearvuecyclones.com/v/Dust+Hoods+and+Pickups/Sliding+CMS+DC/CIMG5239.JPG.html


IMG%5D
 
On the router table, I exposed the 1" straight bit about 1/16" in front of the fence at a depth of about 1/2". I clamped another piece of wood perpendicular to the fence 3" from the bit (the radius of the pipe). You can then slide the PVC pipe up to the bit and rotate the pipe against the two fences. When you're finished, expose another 1/16" and repeat. When that's done, raise the bit to full height and repeat the process. In a couple of passes, you're done.

Sorry I don't have pics, but I hope this gives a better idea of what happens on the router table.

Cheers, Scott
 
i have done it a few ways. like a couple posts down, i used the bandsaw or table saw to remove a section of a 4" length of pipe. this then slips into the pipe and the flex slips over top of it.

i have also used coffee cans. remove bottom of can and then use snips to slit the can...it will then slip into the pipe. rivet and slip the flex over it.
 
I'm using 4" PVC (yes, I know, 6" is better) and was considering the blast gates that Grizzly sells. The technical specialist I emailed with couldn't give me a straight answer on whether the fittings were compatible with 2729 PVC (also called SD or Sewer/Drain or Thin Wall PVC).
 
Before I began my Clearvue dust collector odessey I read thru the posts, Bill Pentz's site, etc.

I knew at the end I would have to face the flex hose/pvc issue.

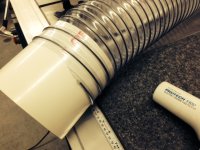
First, my accolades to any who managed to stretch a piece of 6" flex hose (I used Wynn's) over a piece of 6" S&D pvc - as one post mentioned, the pipe has an od of 6.25" and the hose has an id of 6" - that last quarter of an inch (with the wire reinforcement) is a bit tough.

My method is a trifle crude but works well and fast (well and fast is always good).

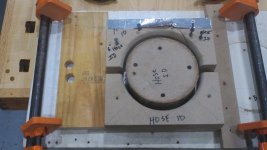
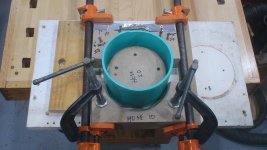
I clamped about a 12" length of 2 x 4 into the vise so that a "tongue" would stick out beyond the vice by about 6". This tongue enable me to slip a few inches of the flex hose over the tongue and clamp a portion of the hose near the end of the hose to the tongue. Then, positioning the hose so that I could somewhat isolate a section of the hose with its internal wire re-inforcement at the front/closest corner of the tongue (bend the hose down towards the floor so as to "raise" that section of hose & wire a bit), I could easily cut/nip thru the wire with a sawzall.

Of course, this also nipped thru the hose; however, that is not an issue. I would then remove the hose from the "jig" (elegant jig) and, using a pair of vicegrips, pull the cut wire out from the exposed end of the hose. The trick here is to cut no more than a coil or so of wire; otherwise, it requires too much force to remove the internal wire, and most woodworkers would lack the manly strength to enable doing this. :)

Repeat the process a few times so that two or three coils of wire have been removed. Of course, in subsequent approaches to removing the wire, oneself is sequentially grabbing the cut end of the wire via the nipped-out opening starting at the last cut coil section in the body of the hose and, in this way, working up the hose.

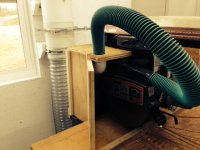
The mischief in trying to get the hose over the pvc is the wire reinforcement; not so much the body of the hose. Once the wire has been removed, it is a fairly simple matter to use a heat gun on the hose body, and stretch it over the pvc.

I don't recommend going more than several coils of hose up onto the pvc (firstly, it does not seem to be really necessary to go more than that amount of hose) since, as the hose cools, it is harder to pull it up onto the pvc.

Once the hose is on the pvc, I secure it with aluminum tape - other types of tape could be used. In some instances I will also clamp it; but, the clamping is hardly necessary. The taping will cover over the slits in the hose from the sawzall.

That's it - after a few trys/practice it shouldn't take more than 5 minutes or so from beginning the process to having the hose pulled up onto the pipe.

The same process works for the 4" hose & pipe although it is actually harder to pull the hose up onto the pvc since, when you heat the hose, it shrinks a bit. However, it is a non-issue.

I hope this helps
 
Flex Hose and PVC

Flex Hose and PVC

The flex hose fits perfectly in the bell side of the PVC pipe. However, what some people do is make a donut to slip over the PVC about an inch wide. Then make another donut and attached the flex hose to the inside of that donut, then screw the two together. To attach the big donut to the outside of the PVC use a small screw from the inside. Then seal around the wood donut. You can use the bandsaw for the donut, or a good CNC machine if available.

For anyone interested, Clear Vue would be happy to make some of these donuts, just give a jingle.
 
Donuts

Donuts

Hi Jamie,

I used modified donuts to attach couplings (90's and straight collars) to mdf plates which were then attached to various woodworking machines so as to enable DC connections - the process worked well.

I had recognized that the flex hose would slip inside the bell ends of the S&D pvc; however, that was too easy so I figured something must be wrong ... :)

The Clearvue cyclone (I have an 1800) works very well; however, I knew that keeping turbulence down in connections, etc. would be a consideration.

We are in, amongst other fields, the commercial and residential vacuum business for almost 60 years. In the USA (now almost all made in China) vacuum manufacturers design hoses, wands and accessories so that the hose fits into the wand or accessory. The Japanese vacuums were designed so the the attachment fit into the hose. The latter design reduces turbulence.
 
I only used one length of flex onto the BS. My method was simple, butt it up to the pipe and duct tape it, works for me.
 
I've had similar success connecting 4" flex to 4" black PVC for my smaller machines. Hopefully it will work for you, too. Scott
 
I am installing the ducting for my CV1800 at the moment, and am using Wynn 6" flexible hose. I have been able to slip the hose over the end of 6" PVC. For me, the secret is to keep the hose a little stretched out. This increases the inside diameter just enough to make it possible. It still takes some effort, but it does work. I am slipping enough of the hose on so that I can have the hose clamp an inch or slightly more from the end of the pipe.

Noel
 
I am almost finished running the pvc and now I'm in the process of attaching 6" flex to my machines. Its almost like being married to a blonde for 33 years, its kinda tough at times but you can do it if you stick with it. Same for the flex pipe, kinda tough but you can do it if you stick with it. I only used a hair dryer and my fingers and managed to get a few rounds of the Wynn flex over the 6" S & D. I used a short piece of a swimming pool vac hose to attach the front of the RAS blade port, it was a snug fit over the guard and I glued a 1 1/2" 90 fitting into the shroud that the hose slides down into. So far so good
 

Attachments

  • 106.JPG
    106.JPG
    135.7 KB · Views: 0
  • 107 - Copy.JPG
    107 - Copy.JPG
    125.4 KB · Views: 0
  • 108.JPG
    108.JPG
    138.7 KB · Views: 0
Yeah, I wanted the bridge clamps too. Couldn't get my Scottish blood (from my Mom's side :D ) to fork over the extra bucks, so I made my own. They seem to work great. But lately, I've not been using clamps at all...the tight fit of the flex seems to work just fine. Jim.

All of my connections between flex and PVC include foil HVAC tape. Are the bridge clamps really that necessary if one is sealing the hose ends with foil tape anyway? Seems regular hose clamps would suffice.
 
I've never used the bridge hose clamps that ClearVue sells -- rather, I have used the Shop Fox Wire Clamps that Grizzly sells (Shop Fox is a trade name for products from a subsidiary company owned by Grizzly called Woodstock International). They are available from Grizzly (link here), but I used to buy them from Redmond Machinery for less than the listing above. I find them very effective, tape or no tape.

Hope this helps.
 
Uniformly Compressing SDR-35 PVC Pipe to Receive Flex Hose

Uniformly Compressing SDR-35 PVC Pipe to Receive Flex Hose

I am just finishing up the installation of 6” SDR-35 duct work, and like all those on this thread, I was confronted with the problem of connecting 6” Flex Hose to SDR-35 pipe. My solution was to compress the outside diameter of the PVC enough so that the Flex Hose just fits over the PVC pipe. I am not sure this method is good for someone needing to make only one connection, but if multiple connections are needed, then it may be worth the effort.

This method requires a shop made OD Stamp that compresses the OD of the PVC pipe. A disk that prevents the inside of the PVC pipe from puckering while the PVC pipe is compressed is also required. The heat softened PVC pipe is compressed using pipe clamps, resulting in a consistently perfect fit. The ID of the PVC pipe can be beveled with a wood rasp and sandpaper to smooth the transition to the Flexible Hose and reduce turbulence.

I first glued together three pieces of ½” thick (two pieces of ¾” thick also work) MDF measuring 12” x 12” with wood glue. After the glue dried, I flushed up all edges of the MDF sandwich. I drilled the center point in the MDF sandwich and dropped it on a sliding circle cutting bandsaw jig. The jig is set to cut a radius that would result in a circle that is a slightly less than the Flexible Hose inside diameter. This results in a circular disk and MDF sandwich with a hole. The MDF sandwich with a hole is the OD Stamp.

The OD Stamp is cut in half and one half of the OD Stamp (which was two pieces owing to the bandsaw entry cut) is attached to ¾” plywood (with the bandsaw entry cut is butted tightly closed). Straight pieces of scrap are attached to the plywood to act as runners for the now two piece OD Stamp. When the free half of the OD Stamp is placed on the plywood, it can slide along the runners until it butts up to the fixed half of the OD Stamp, forming a hole whose diameter is slightly smaller than the ID of the Flexible Hose.

Returning to the circle cutting jig, it is set to a diameter that is slightly less than the Flexible Hose ID minus 2 x the thickness of the wall of the PVC. For example, if the ID of the Flexible Hose is 6” and the wall of the PVC pipe is ¼”, set the circle jig to cut a circle a diameter slightly less than 6” – 2 x ¼” = 6” – ½” = 5 ½”. The disk is recut from the MDF sandwich to this new diameter at the bandsaw.

The newly cut disk is waxed and positioned it on the plywood in the center of the OD Stamp. The free half of the OD Stamp is positioned on the plywood about 1” away from the fixed half of the OD Stamp. After heating the PVC pipe until the entire perimeter of the pipe is softened and flexible, the PVC pipe is placed over the disk and into the OD Stamp. A pair of pipe clamps brings the two halves of the OD stamp together. C clamps set loosely in place keeps the free half of the OD stamp from riding up as the pipe clamps are tightened.

After the PVC cools, the PVC pipe is removed from the OD Stamp. The PVC pipe comes out of the OD Stamp easily. However, the PVC pipe grabs the disk. The disk is removed by tapping it used a piece of scrap long enough to reach to the bottom of pipe and rest on the disk. I found gently heating the outside of the PVC pipe just enough to melt the wax on the disk makes removing the disk a little easier.

I am not sure what out-gases from PVC when heated, so heating should be done is a well ventilated area.
 

Attachments

  • PVC Flex Hose Stamp (800x450).jpg
    PVC Flex Hose Stamp (800x450).jpg
    195 KB · Views: 1
  • PVC Flex Hose Stamp In Use (800x450).jpg
    PVC Flex Hose Stamp In Use (800x450).jpg
    204.8 KB · Views: 1
This wasn't my idea, but someone in this forum suggested using a rabbet bit on the router and reduce the diameter of the 6 inch pipe that way. It is still a bit snug, but this works well. Hope this helps!

IMG_1290 (3).jpg


IMG_1293.jpg


IMG_1292.jpg
 

Attachments

  • IMG_1290.jpg
    IMG_1290.jpg
    69.6 KB · Views: 0
Back
Top