Venting outside and ducting - I am brand new to dust collection

Good afternoon:

As Rushton said... it arrived blue. I was looking at video or something which is where I got the idea it was not painted. I'll take the time to put a clear coat on it I think, after I caulk it all. I picked up most everything I needed at Home Depot today..... wire, circuit breaker, duct flange, caulking, a torque wrench, and monster screws to hold the platform to the wall. I went to get the tape... I always planned to tape the joints of the duct work at the least, but I was not sure what to buy if I should decide to get the tape for outside (and inside) the pipe. The tape I looked at was chrome colored and only about $13 a roll but I'd like to make sure before I buy.

The only thing I don't have yet is the filters, but I have more than enough to start roughing in my duct work, assembly, etc. Can anyone tell me what the name of the tape is... where I can get it. I just don't want to do it with the wrong thing.

I don't suppose there is any way to print the contents of a thread or copy it as a whole for pasting into Word? It would be nice to capture this whole discussion in a word document to be able to reference the whole thing in a booklet. I know it is here, but I have also been looking through old posts and finding many links are now dead, and I believe at least one of those dead links was to another topic.
 
Aluminum Tape - Most people I've head from have simply used the aluminum HVAC tape available at their local home center, Home Depot or Lowes, like this tape. I was making an order from Amazon for a bunch of stuff and I ordered this tape. I would think either would work fine.
 
egbell,

Foil Tape: I mistakenly indicated that I used 4” wide foil tape when in fact I used 3” wide foil tape. Here is a foil tape at Home Depot that would work. I have purchased silver colored tape in the past (before installing my CV1800) that was not foil tape and was not electrically conductive. For grounding purposes the tape must be electrically conductive. Aluminum foil tape meets that criteria.

https://www.homedepot.com/p/Nashua-...reme-Weather-HVAC-Foil-Tape-1207801/100507541

But for the price and width differences, the tape posted by Rushton would be my choice.

Copy and Paste: A post can be highlighted using the mouse and then, while holding the CTRL key down a tap of the “C” key will copy the highlighted text. The text now copied to the computer’s buffer can be pasted into a Word document or most any other program by holding the CTRL down while the “V” key is tapped.
 
Good morning:

Thank you. I asked the young lady at Home Depot about tape for duct work. (I knew not to just get 'duct tape'). I knew there was little use explaining to her what I wanted it for. She took me to an endcap and I realized I was lost... no idea what I needed. I picked up the shiny stuff thinking it should be conductive, but I just could not find evidence on the package that it was. This is a 60 mile round trip for me, so I'll get it the next time I'm out there, but now I know what to get. I'm still going to be quite deliberate about all of this. Even with the help all of you have given me, it is intimidating... just the amount of work I have to do. Not in small chunks though.

I was scanning the photo galleries yesterday and I saw someone who mounted the filters horizontally in a box. His comment indicated that he was using the filters 'outside in as they were designed'. I'm going to do the standard install now, but is that the way the filters really WERE designed to work? Air from the outside in and through the filters?

Jsbrow: I was hoping there would be a way to grab the whole thread in one operation. I was hoping I would not have to do it one post at a time, or even one 'page' at a time. There are now 5 pages and I know I still have a way to go. I was clicking CTRL-A, which highlights every message on the page at the same time. That would minimize the number of copies, but it copies EVERYTHING. Links, pictures, bullet points, etc. and I was looking for something that would grab a 'printer friendly' copy. The upside is that it also grabs the links. (I have noticed that a LOT of links on old posts are no longer valid.)

One last question about the forum itself. I went into my profile to edit it and was not able to edit anything on it. I get this:


Cannot change custom field.jpg

There is nothing that I MUST edit, I was just exploring.
 

Attachments

  • Cannot change custom field.jpg
    Cannot change custom field.jpg
    17.1 KB · Views: 0
  • Cannot change custom field.jpg
    Cannot change custom field.jpg
    17.1 KB · Views: 0
  • Cannot change custom field.jpg
    Cannot change custom field.jpg
    17.1 KB · Views: 0
I went to the link in Rushton's post. I started reading the customer question/answers and found they also make a copper tape. It is a bit more expensive. $14 for 25 yards, but it is listed as highly conductive.

https://www.amazon.com/dp/B01IQ8KNYK

Would that make it better, and would better make that much difference for this application given that it is twice as expensive as the aluminum tape? and does running aluminum to a ground in steel make any difference.... I had an electrician install 200 amp service to my house in Pittsburgh years ago and he ran an aluminum ground wire and the inspector made him change it out with copper. I would have to ground this to something steel that is grounded, right?

My wife has a Prime membership so shipping is always free on Amazon,and it is fast, so this is a REALLY good suggestion for me. This one roll of aluminum would probably do my whole install.
 
Conductive Tape - I've not heard of anyone using copper tape, although surely it would work well. I've only heard of people using the aluminum tape for both sealing joints and running the length of the ducts for static reduction. You will need to ground your conductive tape to an ground point using a bit of wire. Ron and Denise Nikkel reported good success just taping across the bare ground wire to make the electrical connection, but I would attach it to a screw that securely "sandwiches" the conductive tape.

Horizontal Filters - horizontal mounting has worked for a number of people where space limitations required this. What you lose is the dust settling vertically into a dust collection bin as would be the case in vertical mounting.

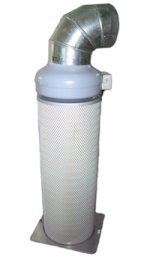
Outside-In and Inside-Out airflow - Filters are designed to trap particles most efficiently in a single direction only, either from the inside of the filter being pushed to the outside of the filter, or from the outside being sucked into the center of the filter. It's a matter of how the paper is oriented and the chemical treatments applied to the sides of the paper. Wynn Environmental is very clear on the need to choose the correct direction filter for one's application. It's quite possible to build effective dust filtration using either, but don't mix them up! For example, in the standard CV1800 filter configuration, the filters are "inside-out" airflow filters, but in the Bill Pentz air cleaner design (a high volume blower mounted on top of the cylindrical filter) the airflow is "outside-in". The filters look the same from a casual visual inspection, but they are not the same. Here's a picture of the "outside-in" filter from Pentz's site: air_cleaner_sm.jpg
 
Last edited:
One last question about the forum itself. I went into my profile to edit it and was not able to edit anything on it.
I can't either. I think this is a feature of the forum software that Clear Vue has not enabled for some reason. It would be nice to be able to add location information for our profiles, as well as whatever folks might wish to share.
 
Hi:

I started today.. roughing in my duct work. I tried to be clever on one side but I don't think I'm going to get away with it. My installation has a length of straight (will have) along the wall, just below the ceiling. There are 2 large beams that run the length of my house with about 7 feet between them. My collector will start out perpendicular to them. The first drop will occur after the 5 or so feet off of the collector, then it will branch up between the beams and take a nice sweeping left to cross the shop. This up and left is where I had to stop. First, I only have the 4 elbows. I used two of them to start with the final drop. I was HOPING I could do the up and left turn with 3 elbows (which is where the 'too clever' part comes in). I figured one to start the incline (45 degrees), one 45 degree at the top of that tilted down to meet the pipe sloped up which would start the left turn, and another one at the top of this upward sloping piece to complete the 90 degrees to cross my shop. I'm going to close in the space between the two beams with flakeboard or something through which my duct work will pass so my duct work only extends partway on both ends of the shop. There is about a 7 foot gap between the two pieces currently where there will be the only other 2 drops I will have. Obviously these have to meet and that is where I'm running into a little trouble. I did not try the span yet because I don't have the elbows, time, or energy today, but I am hoping I can use one or more of the following:

I have read that there are fernco fittings that will fit this pipe and I know that will give a little if I need it. I don't have much room to go up and make the turn with the long sweeping curves that are my goal. The other thing I'm considering is whether 22.5 degree elbows will allow a little adjustment with the turns I have to make. Another thing I saw someone did, somewhere in this forum or in another one, was to cut a 45 degree elbow in half, reverse the piece, and glue it back together. I cannot quite visualize that but it opens up a way I might be able to cheat things in if I have to. Has anyone seen the site linked on Bill Pentz's site for software that creates templates you can cut from PVC pipe and glue up yourself to make your own PVC joints. I tried to find a price but could not. It seemed like a pretty cool thing to be able to do but there is a limit to how much I'd spend on a one-time thing like that. You can download and use it, just not print w/o paying. I don't believe I was able to find the download link either.

I printed my manual, laminated the pages, and bound them with my comb binder. Unpacked the boxes and took inventory. I'll nibble away now at the installation. I would like to record a video but I don't think I can do that.

I believe I have figured out a way to hoist my motor by myself that I think is going to be very comfortable, easy and safe.

Six inch PVC pipes bouncing around my shop are conjuring memories of Blue Man Group concerts.

Finally, I was reading old topics here and found one that did disturb me a bit. It had to do with the stated efficiency of the filters (99.9% efficient at .5 micron) quoting information from even the Wynn site that put that statistic into context, and the need the filters have for dust cake, and the fact that the efficiency of this device works against the efficiency of the filter somewhat because it takes longer to build up this dust cake. This did not change my feelings about where I'm at/whom I'm with. It removes any aura of perfection, but maintains my confidence that I'm getting the very best possible with Clear Vue. I apologize for not linking the discussion here. I rarely think to do that when I'm reading through this stuff. On the other hand, it was a long time ago.

I also ran into the information similar to what Rushton posted about airflow direction, though not as detailed as he made it, about how Clear Vue got the inside->out filters made for their product. My question about that arose because of comments that accompanied some of the items in the picture gallery.
 
egbell,

I do not have a clear understanding of the piping issue you discussed other than there is an area in the duct work that requires some tricky turns. While solid pipe is best, a short length of flex house is always an option. The “smooth walled” flex hose is likely to offer less resistance to air flow than the less expensive flex hose whose interior walls are corrugated. If flex hose is used, keeping long sweeps in all directional changes would be better than sharp turns.
 
jsbrow: I am kind of obsessive. I am going for no flex pipe in my mains and the barest minimum in my machine connections. I did consider what you suggest and it may be where I end up. I'm sure it seems silly but you would have to know me to understand. Did you ever see Monk on TV? I'm not that bad but there are some things I just cannot get past and if I end up having to do that, it is the first thing I'll see every time I walk in my shop forever and I'll obsess about lost efficiency and not doing it how I was supposed to do it, and even being aware of that does not help me get past it.

Rushton: I did see that when I first stumbled on the link. I thought that it said that the free version had been superceded by the commercial version.. which still creates the templates but does not print them. I'll take a closer look now. Maybe I read more than was really there. It was a digression while reading Bill Pentz's site so I could have paid less attention.

.I started assembling my dust collector and have some observations. Observations differ from complaints in tone and intention. I have only observations. No complaints.

1) When putting the mounting assembly on the motor, there is nothing that tells me how to orient the motor. I presumed that the box with the reset button is where the wiring is to be done. I just checked and see the stamps for the knockouts so I’m pretty sure I’m right. I put that in front (strip side of motor mount) and this could also be the back, but I’m not sure this is the way I should have done it. I don’t know if this matters but hopefully someone here can point out that I did it right or I did not. If this is silly, please feel free to point that out too. Stressing and ready to undo things to make sure it is right.

2) The documentation says that the taper lock is “in a small box inside the materials box”. The small box had only a piece of paper with font difficult for me to read. I have been over and over and over this so I had an idea of what the taper lock looked like, so I was able to find it. It was already on the impeller. Less preparation would have sent me in panic mode thinking I was missing something, and this would have been worse because I would have had to wait until tomorrow to learn it was a dumb thing to panic about.

Part of my job is computer programmer and I also document my work. I make it a practice to document everything I do, especially when I have changed something. In my world, this is only to cover my copious backside because reading documentation is not something the people who use my programs practice consistently. They can complain but they cannot say it was not documented. I suspect this was all a result of a change in procedure that did not get reflected in the manual.

Getting the taper lock off was pretty easy because I had read a topic somewhere where McRabbet explained to someone about how to do that. There SEEMS to be an explanation of that on the paper in the taper lock key box, but the font is so small I had trouble reading it.

3) I have two T-Handle allen wrenches for my shopsmith. They came in a set and as fortune would have it, they fit the screws for the taper lock and key stock.

4) There was a slight burr on the .key slot in the taper lock. Not a complaint, just an observation. I spent two years as a machinist apprentice before the shop closed up and am sensitive to these things and the effect they have on metal to metal fittings.

5) There is nothing in the documentation to say that you should make the key flush with the taper lock/motor shaft. I presumed that was the case and did it. Again, not a complaint. As I said, I’m a programmer and I think very explicitly and it is a bigger issue for me if my instructions include gaps filled by knowledge of the documenter. I do this myself so I know it happens easily.

6) My torque wrench is in inch pounds. I did research and found that this is a straight conversion… 12 inch pounds to a foot pound. However, it is ¼ drive and my allen socket is 3/8 drive. I’ll get the adapter tomorrow or Wednesday. Here is another documentation issue too. A Husky wrench. The documentation shows ‘ft lb’ stamped on the wrench shaft. The wrench shaft is stamped ’in lb’. Nothing to do with my dust collector. Just an impact on what I did today.

7) I am not ready to put the wall assembly in place, but the documentation says to ‘secure the motor-impeller assembly to the wall assembly…’. There are no details. I could swear I’ve read this somewhere in my travels, but I would sure like to make sure I do this right. I am sure this is probably silly but where things are not explicit I worry that I’m doing things insufficiently. Are screws into the 2x4 enough, or should there be bolts holding the platform to the wall bracket?

8) Has anyone ever tried using the box the motor is shipped in as a dust collector bin? I’m not being serious, but that is a serious box!
 
Yes, the instructions do have some gaps and require making some inferences to fill the gaps.

Motor Orientation - It can be oriented to best meet your needs for access. There is no single or preferred orientation as long as the four bolts are secured. As you did, I oriented my motor to most easily access the wiring box at a later time.

Secure the motor-impeller assembly to the wall assembly -
In Step 7 (page 16 of my copy), you will see the instructions to securing the motor assembly to the wall assembly:
10. Once the system is mounted, secure the motor mount assembly to the “L” brackets using
either 1 ¼” sheet rock screws or ¼ - 20 x 1 ¼” bolts. Pre-drill holes using drill bits so the
assembly does not crack.
 
Ed,

I would recommend installing a non-metallic conduit whip like this one that is six feet long and comes with water tight connectors on each end and is pre-wired with #10 wire (one with #8 wire is also available) to connect the motor electrical junction box to a switched disconnect for your installation. The fitting with the elbow will fit into one of the knockouts on the motor connection box and the straight one into the disconnect. Cheap and provides a good dust proof connection. If you use the ClearVue Electrical Box, then run the 240 VAC feed from it to the disconnect. If you did not buy the CV Electrical Box, buy a 240V contactor like this one and a metal enclosure to house it (one is shown on the Amazon page as a Frequently Bought Item).

Although the Taper Lock cap screws only require 5 Ft-Lbs of torque, it sounds like you have a pretty small version at 1/4" drive.

If you have a burr in the key slot of the taper lock, use a small fine file to remove it. I've looked at the latest Assembly manual (I have several going back to the original one issued in 2006-7) and the details on the taper lock are pretty well done and there is a specific addendum on the taper lock itself.
 
Good afternoon:

One filter arrived today. Go figure. The guy said it happens and expect to see him tomorrow. I am going tomorrow for 16 more 45 degree elbows and I think that will be all I need for that. I mapped everything out again for a final version and I am really starting to feel like I own this part of things. I got here on your (plural) shoulders and I really appreciate it. And as for the flex tubing, I am going to just use the 4 45 degree elbows to make my turn. It was my trying to do it in three that was causing the heartburn.

Rushton: I am going to make my brackets. I had ordered theirs but they were back ordered and while waiting I discovered I could remove a ceiling panel or two and get the height and at that point, making them was the only real option anyway. I have a plan for raising the unit by myself and I expect it to be pretty easy. I hope to make a video that will either prove me right or be used as evidence against me. This info is helpful. I will use bolts. Part of my plan is to mount the bracket on longer 2x material lower, where I can work on it easily and then to raise the whole assembly into place and secure it to my wall like that. I don't know how that sounds but I have a very high level of confidence that it is going to go very smooth.

Rob: I have been reading and reading this forum, and I have gotten many tips from you from many years. One such was the switch, which I already bought. I got a 60 amp AC disconnect. I hope it is right. I got that because I saw a discussion between you (I'm pretty sure) and someone else about the amps required in context of the motor size and the consensus, as I recall it, was to get the higher amp switch. I just pulled it out of the box and I may have to return it. It seems to be a 'switch' that I have to pull out, rotate, and reinsert if that makes sense. I'm inferring that because of the ON and OFF lettering that are only correct if you do it that way. I did buy the Clear Vue electric assembly and have been collecting message links from a LOT of years about this, many originating with you. I will do the whip, though I thought I read somewhere that it was not necessary. If it is the best way to do it, I'm going to do it. Thanks for the picture/link. The wiring is the last thing I anticipate doing, after the duct work and dust collector are all in place. If there is a flaw in that sequence, please let me know asap. I don't want to paint myself into a corner if I can avoid it by changing my plan.

I did not pay close enough attention when I bought the torque wrench. I thought it was a 3/8. I don't use torque wrenches, but I'm hoping this one will do for three screws at such a low torque. And I had already done exactly what you suggested with the burr. It did not require much. As for the taper lock, it was the fact that it was not in the box. I am a creature of habit. If my wife puts my keys in the left section of my key drawer, I won't find them because I keep them in the right section. The taper lock was not in the box and I started to panic. I just settled down and found it. I'm good to go with the assembly I have done so far.. just holding off until I get the adapter for the torque wrench.
 
Ed, it sounds like you are making good progress. Congratulations.

Electric Switch Assembly - if you purchased the Clear Vue Electrical Box with Remote assembly (link here), it will come with a power cord "whip" to connect to the motor. You won't need to buy a separate whip. Also, it will have the plug already installed on it so it can be plugged into the 30A receptacle built into the electrical switch assembly.

Brackets and Mounting - I like your plan to make an elevating mounting assembly and making your own brackets. Just be sure your supporting 2x4s or whatever you end up using are substantial and solidly attached. In my case, the entire mounting assembly is free-standing (doubled 2x4s, 2x8s and plywood; my mounting backboard is a double layer of 3/4" plywood) because I didn't want to have it attached to some part of the house due to vibration/noise transmission. I look forward to pictures!

Thank You to Rob (McRabbet) - Rob, I join Ed's thanks to you for all the information you've shared over the years. Your contributions have been very helpful to my learning curve.

Jsbrow - Additional thanks to you, also. You are a generous contributor and I've learned a lot from your posts.
 
egbell -

We have intentionally turned off private messaging on this forum to try to prevent spammers. Additionally by having everything public, your feedback is shared with everyone on the forum.

Thank you!
CVC Support
 
Good afternoon:

I have a question about assembling ductwork. Do you recommend any kind of lubricant... some kind of grease or soap or something to make the filttings slide on easier? I started doing some assembly yesterday of Wyes using a short length of pipe. I have a couple cases where I need to do that for my drops, and I noticed that pushing the pipe fully into the Wye is non-trivial and I don't want to think about getting them back out. I did not use any kind of lubricant but if there is a trick that I don't know, I figure the only way to learn is to ask.
 
I've seen recommendations for a bit of hand soap and water as a lubricant for the fittings, nothing that would be permanent. If the fit is too tight, you might consider sanding one of the surfaces just a bit to provide just a little more clearance.
 
Back
Top