Venting outside and ducting - I am brand new to dust collection

I am sure I read somewhere that the remote control should be wired into the shop light circuit to prevent something from triggering the unit to start by itself, even with no one in the shop. I don't for the life of me remember where I read that.. most likely on this forum. Does anyone recall seeing that, and can you point me to the procedure to do that, if it is appropriate?

Ed, I'm pretty sure that suggestion came from Rob (McRabbet). It was to prevent some external source from triggering the wireless remote switch. If you connect the wireless remote switch to the same circuit as your shop lights, the suggestion went, then you can be assured there won't be an accidental start up of your cyclone when you're not even in the shop. In my case, I simply pulled a cable from one of my lights down to the panel on which my cyclone electrical switch is mounted and used it for the 120v source needed by the switch to operate the wireless remote and contactor. The wireless remote and the contactor requires very little power to operate. If you purchased the Dust Bin Sensor, then connect it to the light circuit.
 
The barrel I have fits under my cyclone, but it is not low enough to accommodate the 6 inches of flex hose. If I cut the top as suggested and bend it up, I don't believe I could get the top off to empty the barrel.

Ed, before you dive into cutting the barrel down, could you make everything fit with less than a full 6" of flex hose (e.g., 2")? Also, can you make a "permanent" connection of the lid to the bottom of whatever length of flex hose and then slide the drum out from under the lid (leaving it hanging from the bottom of the cyclone?

This latter approach of "permanently" attaching the lid to the cyclone is what I'm doing here so (1) I don't have to pull the flex hose on and off to remove the barrel and (2) I only need a minimal amount of clearance to lift the lid to remove the barrel. I'll have a second lid that I can put on the barrel once removed so I can then safely carry it outside for emptying.
 
Egbell,

It sounds like you are making good progress; congratulations! For me it was a lot of time and money, but that is now behind me. I my opinion it was worth the effort and a good purchase. I trust you too will enjoy the dust collector. While installing the system is challenging, increasing the efficiency of the dust pick-ups at some machines can also be a challenge. But for sure, the CV 1800 collects almost all the dust from the shaper or router table, drum sander, jointer, and band saw by just connecting some flex hoses. I am pondering table saw (under the table only) and radial arm saw collection improvements, but have yet to act. These two machines are a real challenge for me.

Remote circuit wiring. A Clear Vue technician recommended that I switch the remote. I assumed that it was to prevent accidental startups of the CV1800 from stray RF signals. While I have not had any mysterious, stray RF startups of the cyclone, I have accidentally bumped the remote hanging from my belt causing the cyclone to start up. These occasional accidental bumps of the remote cause me to flip the relay switch OFF when I am emptying the bin. I would hate to re-enter the shop from emptying the barrel and discover the cyclone on and spewing residual dust everywhere from an accidental bump of the remote.

My approach for switching the relay was to add a 120v receptacle that is controlled by a conveniently located switch. The receptacle was placed so the 120v plug from the relay box reached the receptacle. If the cord from the relay box is too short, it could be replaced with a longer cord outfitted with a 120 v plug that would reach the receptacle.

Dual flex hose. I too found it easier to add a second dust port to a few of my machines rather than enlarge the existing 4” port. If the second 4” port is thoughtfully placed, dust collection at the tool could be improved.

The cross sectional area of a 6” diameter pipe is about 28” while that of two 4” dust ports is about 25” (12.5 sq in X 2). Thus dual 4” dust ports are about 90% of the cross sectional area of one 6” pipe. However the manner in which the transition of the 6” pipe to dual 4” flex hoses is important. In my judgement, the Woodstock 6 x 4 Inch Dust Collector Adapter D4240 is superior since both 4” legs dump directly into the 6” opening of the fitting. (see http://www.toolplanet.com/product/W...MIz63RiMik2gIVBrnACh1oPgN4EAYYASABEgLxlfD_BwE)

A 4” x 4” x 4” wye transitioned to 6” pipe with a 6” x 4” reducer would likely restrict air flow.

The barrel. I see no reason why the bottom of the barrel cannot be cut to reduce the barrel’s overall height. My approach would differ from the approach you outlined; if I understood your approach correctly. I would be tempted to cut a disc from ¾” thick MDF or plywood whose diameter would match the inside diameter of the barrel. The disc would then be installed flush with the bottom cut edge of the barrel and secured with washer head screws through the barrel into the edge of the ¾” sheet good. The sheet good disc could be reinforced with wood glue. Finally, I would run a bead of silicone on the inside seam to ensure an air tight seal.

But before cutting a $100 barrel to fit under the cyclone, consideration could be given to reducing the length of the 6” flex hose that transitions from the cyclone body to the lid of the barrel, as Rushton suggested. As a wild guess, a 2” length of flex hose extending down from the cyclone body may be sufficient to allow the lid to lift off the barrel.

Another debris barrel approach. My approach to the barrel differs from most. I did not like the thought of having to deal a barrel lid locking ring. Additionally I wanted a stable platform to which the McRabbet bin level sensors would mount and I wanted the ability to look inside the barrel while the cyclone was operating. I met these requirements by constructing a “dust collection chamber” into which the collection barrel sets.

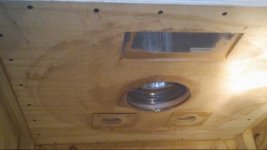
The dust collection chamber is a plywood box sealed with silicone caulk. The top of the box is permanently attached to the bottom of the cyclone outlet via a short length of 6” flex hose. The box is a 5 sided ½” thick plywood box. The sixth side is a door fitted with weather stripping and held closed by 3 window sash locks that pull the door tight when closed. Polycarbonate covers a pair of holes cut in the top. An under cabinet switched LED light illuminates the interior of the dust collection chamber while the second hole in the top is a viewing port. The dust collection barrel was sized to allow a 3/4” gap between the top of the barrel and inside surface of the top of the dust collection chamber. A rubber bicycle inner tube was added to the barrel to form a seal between the barrel and the top of the dust collection chamber.

This approach took some extra time and materials and some planning but I find emptying the barrel is as easy as opening the dust collection chamber door and sliding the barrel out. It is very fast and convenient. The LED light and viewing port allow me to judge whether the barrel can accommodate additional shavings from a planer run or whether the barrel should be emptied without turning off the cyclone.

But the issue I can foresee, were you to adopt the dust collection chamber, is containing the debris in the barrel as it is moved from the basement to the outdoors. Some type of lid that would work with the bicycle inner tube gasket on the top of the barrel would have to be figured out to prevent dust spewing out of the full barrel as it is moved upstairs and outdoors. Perhaps a contractor’s sized trash bag or a sheet of plastic secured over the top of the drum with a bungee cord would be sufficient.
 
Good morning:

Rushton:
~could you make everything fit with less than a full 6" of flex hose (e.g., 2")? Also, can you make a "permanent" connection of the lid to the bottom of whatever length of flex hose and then slide the drum out from under the lid (leaving it hanging from the bottom of the cyclone?~

This was always my intention. I just presumed that what you envision is what most everyone does, and that the flex hose had just enough give to do what you anticipate doing. My problem is that I have only about 1.5 or 2 inches and I am afraid that if I attach things to just that, I'm always going to be fighting to get the lid off/up enough to remove it, or to get the flex pipe back on. Given that my filter stack fits SO precisely between floor and transition and that my barrel is a full 2 inches less than that pictured in the CV dimension diagram, I am stumped by how tight this is. I'm not going to charge into this without a lot more thought, but this is one more hiccup I need to think through, so I asked for help. I am going to think about an enclosure too. I like that because it would prevent bumping the barrel with anything while flitting around a small shop. I'm also a little affected by a discussion I saw on this forum that suggested that 6 inches is too short for the flex hose... that there is some sweet spot between 6 and 10 inches for the flex hose, not that I will be able to do either with what I have just this minute.

Jsbrow: I only just recently rewired my shop lighting replacing 4 suspended 4 foot fluorescents with 9 LEDs. I was pretty deliberate and used several junction boxes so I have a way to do this easily. Also had not considered potential of power-up when the barrel is removed. The gist of my question was more how to connect the remote receiver into my circuit, but I had an epiphany and then your allusion clarified things. I bought the CV electric box and there is a 120v plug on the box. It just finally occurred to me that the device plugged into that is for the remote. That probably solves my problem. I just run an outlet from my light circuit and plug it into that instead. Does that make sense/sound right?

For the bottom, I envisioned making what many have done for a top... cutting a circle and then routing a rabbet around the circumference, but other than that, exactly what you visualized. Given that both you and Rushton suggested a shorter flex hose, perhaps I need to take a closer look at that option. Awhile back, I bought a 6 inch takeoff I planned to use and there is where I'm coming from when talking about cutting the barrel. I read the CV suggestion of a 1/2" lip bent from the lid itself. I feared that it would not be long enough or strong enough to stand up to the pressure of a band clamp and frequent stress of raising the lid. I'm going to take a closer look.

I like your idea of the enclosure. I do have a question for you that has been puzzling me since I first read your post about your approach:
~The dust collection barrel was sized to allow a 3/4 inch gap between the top of the barrel and inside surface of the top of the dust collection chamber. A rubber bicycle inner tube was added to the barrel to form a seal between the barrel and the top of the dust collection chamber.~

Is this inner tube inflated? The first time I read it I presumed it was just a flat tube used as a rubber gasket but then there is that 3/4 inch gap thing and that is what I finally inferred had to be done. If that is the case, I'm warming to your approach, and if it is, how do you get it aligned again when you put the barrel back after emptying it? Do you deflate/reinflate it each time, or just accept the wear/tear of it rubbing against the top when you insert/remove it, or ???? And how did you "add it to the barrel"? I like this more and more!

Thanks for the link for the 6x4x4 Wye. This is exactly what I plan on using for most/all of my drops and I will be using this link for them. I plan on putting blast gates just above them.

For the CV clear blast gates, is there a right and wrong way to install these or does it matter? I have seen warnings that many people install blast gates backward and I'd prefer knowing the right way before I lock them in. I have looked over and over and nothing jumps out at me... but neither did the 'P3' on the motor wire.

Also ironic, the provided link pictures a book I acquired YEARS ago about dust collection and have not been able to find in my shop.

Today I do the last bits of the wiring.
 
Good morning:

I finished my wiring, tested it, and everything worked. Rotation was correct. Remote control worked. I think the noise is going to be tolerable too, though I did not run it very long at all.

I have not done the power through the light circuit as yet for the remote, but it will be a snooze after this! I spent significant time this morning with my continuity tester mapping out the flow of the switches, etc. (again) There were no real directions for the disconnect switch in the manual. The posts were not marked line/load, as some research suggested. I did what I felt was intuitive after making sure of continuity. I went back and consulted other threads on this forum. (Thank you, Rob, for an excellent picture of the wiring inside the CV box that gave me the last needed boost of clarity before I started. There were many others that were very useful but yours was the one that showed exactly what I was going to deal with.) I have to sit down for awhile now and wind down. Even after checking everything 3, 4, and 5 times, there was a lot of anxiety with each step.... circuit breaker, then disconnect, then remote control, then cyclone.

I have a lot more to do now.. barrel, connection at my machines, and restoring my ceilings, etc. and I am hoping for a lot of help/insight with those things as well, going forward (and perhaps having something to offer as well), but I want to thank everyone again who weighed in with this. I'm a bit smarter now than I started (or at least I know more), and who knows when I'd have gotten from nothing to here without your help to this point! Thank you all!
 
egbell,

Blast gate orientation. I did not use the CV blast gates. Many blast gates feature a locking screw. The locking screw locks the slide component of the blast gate either open or closed. Ideally, the locking screw would press the slide component toward the lower pressure cyclone-side of the blast gate. This helps seal the blast gate and reduce leaking. Most of my blast gates are orientated in this manner. However, I have three blast gates orientated so that when locked close, the blast gate slide that blocks air flow is pressed away from the cyclone, thus potentially allowing for some leaking. I did this to make the locking screw easily accessible.

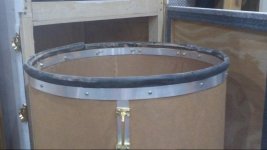
Fiber drum gasket. In the first iteration of the dust collection chamber, the height of the fiber drum was reduced by cutting the drum. A pair of thin (1/8” I think) x 1” wide aluminum bar stock sandwiched the cut edge of the barrel; one aluminum strip inside and the other outside. Short through screws/nuts held the strips in place and reinforced the raw edge of the fiber drum. Since the final height of fiber drum was ¾” less than the interior height of the dust collection chamber, it slid in and out easily.

At this point, the dust collection chamber door was locked shut and I started using the cyclone. However a problem became evident with the first iteration design. Some debris escaped the barrel and landed on the floor of the dust collection chamber. Apparently dust carried in the cyclone’s vortex was cast out along the top of the dust collection chamber and over the top of barrel, between that ¾” gap between the barrel and the top of the dust collection chamber.

The solution to this problem was to add a gasket to the fiber drum that would fill the ¾” gap. I found that a bicycle inner tube was a good and relatively inexpensive gasket. A plain sheet of rubber could also be used. I used both. The inner tube was cut all around the inner tube so that after the inner tube was cut, it was a circular sheet of rubber. The valve stem was also cut away and discarded. The edges of the rubber were captured between the reinforcing aluminum bar stock and the fiber drum.

The through screws and nuts that held the reinforcing aluminum bar stock in place were loosened. One edge of the inner tube was worked into the gap between the inside aluminum and the drum while the second edge of the inner tube was worked between the aluminum on the outside of the drum and the fiber drum. Thus the rubber folded over the top edge of the fiber drum and was captured by the aluminum and the fiber drum; inside and out. It was not especially easy working the rubber between the aluminum and the fiber drum but with patience and tightening the screws and nuts holding the aluminum to the drum as I proceeded helped. As the inner tube was installed, I sought to ensure the rubber extended about 1” above the top of the fiber drum. I also wanted to ensure enough rubber was captured by the aluminum bar stock so that the rubber would not dislodge when emptying the drum. Ideally, the rubber would be fully captured by the aluminum. Thus where screws interfere with the rubber, a slit was cut into the rubber and the slit slid over the screw.

Using a bicycle inner tube made for wider bicycle tires provides more rubber than the inner tubes made for the narrow tires found on 10 speed bicycles. If one inner tube is insufficient, a second inner tube can be butted against the first inner tube (like a butt joint).

When the rubber gasket outfitted fiber drum was put into service I noticed two things. First was that the cyclone sucked the drum up and against the top of the dust collection chamber. The second observation was that no debris escaped the barrel. The floor of the dust collection chamber remained free of debris.

Since there is some resistance and nothing to grab when pulling a full barrel out, I added an inexpensive cabinet handle to the fiber drum. A short piece of the left over 1” wide aluminum bar stock was installed on the outside and inside of the barrel to keep the cabinet handle retaining screws from eventually pulling through the fiber drum or other damage to the drum.

The first pic shows the installed rubber gasket and the handle on the fiber drum. The second photo shows the interior top of the dust collection chamber. The pair of LED under cabinet lights are barely visible in the far ground. The cyclone outlet is centered on the top of the dust collection chamber. The view port is visible in the foreground.
BGSS Blast Gate Switch 800 x 650 (6).jpg

Dust Collection Chamber Top Lower Side (800x450).jpg
 
"Given that my filter stack fits SO precisely between floor and transition and that my barrel is a full 2 inches less than that pictured in the CV dimension diagram, I am stumped by how tight this is."

I also used the 41 gal barrel and was also stumped as to why it would not fit under the cyclone with the furnished piece of 6" flex hose when my cyclone was actually an inch or two higher than the Clear Vue drawing shows. What I ended up doing was to cut two or three wraps of the metal reinforcing wire along with the plastic off of the flex hose and was able to get the barrel to fit under the cyclone. It is a little tighter fit than I would like but it is workable for emptying the drum". I used a 6" sheet metal starter flange and cut it off to about 1" high to attach the flex hose and caulked everything real well and it seems to work well. I also put a piece of 1mm X 12 mm neoprene rubber gasket in the half round area of the fiber drum lid to ensure an airtight seal between the metal drum lid and the metal flange around the top of the fiber drum. The band clamp on the fiber barrel is very tight when the gasket was first put on but gets better after the gasket has been compressed for a while.
 
wmlutz: Thanks for the feedback. I did pause after Rushton and Jsbrow suggested I try to work with what I have. I think I'm going to give that a try before I go cutting the barrel. I was worried about exactly what you said... emptying the barrel... would I be able to get the lid high enough to remove the barrel. I'll look for that rubber gasket... where did you get that? I also have the starter flange and figured I'd have to do what you said you did... trim it down. I'm just not comfortable with the suggestion in the manual for the garbage can lid, though that is probably just me.

Jsbrow: Thanks for the pictures and explanation. They help a lot. I understand now. I have not ruled this out and if I don't get the barrel to work as is, that is the next step. I was wondering if the barrel would be sucked up and sealed by the vacuum. You confirmed that. I'm guessing, since you did not say so, that this happens even as the barrel gets full/heavier.

I had another idea after I read your earlier response... a second bottom, if I have room, that would float inside the enclosure. There would be 2 or 4 posts of some kind extending from this floating bottom to threaded rods through the top to which I thought perhaps I could attach threaded knobs or cam type knobs to pull the floating bottom (and the barrel) up to seal against the top of the enclosure. Then again that might just be a Rube Goldberg solution too clever by half. I'm going to try the solutions you, Rushton, and wmlutz suggested first.... don't 'fix' it until I'm sure it is broken.

Is your light actually in the barrel? That is what I am reading in your responses. I like the idea of being able to see things. I just wondered about the wiring and light... if they were in the barrel somehow.
 
egbell,

Illuminating the Dust Collection Chamber. On my dust collection chamber installation, the LED under cabinet lights are mounted outside the dust collection chamber. Both the lights and the view port were positioned to illuminate the interior of the barrel. The lights were installed opposite the viewing window to reduce any glare.

If I were to build the dust collection today, I would recess the polycarbonate sheets into the top of the dust collection chamber making the inside of the top smooth. In the dust collection chamber I built, the polycarbonate sheets were surface mounted. The reason for the design modification is that I suspect the minor amount of turbulence caused by the surface mounted polycarbonate could be enough to slightly reduce separation efficiency. If the polycarbonate sheets were flush mounted to the inside surface of the dust collection top, the dust particles would be unimpeded as they are flung outward toward the barrel walls.

I used polycarbonate rather than plexiglass because I guessed the polycarbonate would impart less static charge on its surface than plexiglass. If true, the polycarbonate would remain clear and free of a thin film of dust. However, I cannot say for sure that it matters but the polycarbonate remains free of any obscuring film of dust.

Illuminating the Dust Collection Barrel. I can foresee no problems with illuminating the interior of the free-standing dust collection barrel. I assume the lid of the barrel would be permanently attached to the bottom cyclone outlet.

It would require designing a mounting system for the LED lights. This could be done by attaching some ½” thick plywood to the barrel lid. Whatever additional light mounting hardware could be attached to the ½” plywood.

The holes for the lights are probably best placed opposite the view port location. I used two LED cord and plug puck lights. These were bought at Lowes in a set of three for about $15 (if I recall correctly). Two lights would provide plenty of illumination even if a film of dust collects on the polycarbonate sheet covers. The lights could be energized by plugging them into a receptacle. I elected to switch the receptacle into which the lights are plugged so that I could easily and conveniently turn the lights on and off.

I would be inclined to locate the lights and the viewing port midway between the rim of the lid and the cyclone. Once the holes are drilled, the polycarbonate could be attached on the outside of the barrel with through pan head screws and nuts where the head of the screws are on the inside of the lid. Fender washers inside the barrel would protect the fiber lid. A couple of beads of silicone applied as concentric rings around the holes created for the lights and for viewing would provide the air tight seal between the outside mounted polycarbonate and the barrel lid.

The view port could be located opposite the lights and in a location where viewing inside the barrel would be unobstructed from a normal standing position. My viewing port is roughly 3” x 9” (+/- 1” to 2”). It is large enough that I can view a large area inside the barrel. A small view port could restrict the view.
 
Good morning:

I cut my barrel lid yesterday and also cut down the flex hose and takeoff as suggested. It is just too tight to get the lid off. I had mounted the takeoff on the outside of the barrel lid. There was a foam gasket on it, about 1/8 inch thick uncompressed, with peel-off paper. I did not stick it because I did not want to have to undo that if things did not work. I switched the takeoff to the inside of the barrel lid. I removed the foam, which may have been a mistake because it was apparently helping hold the collar to the flange. I cut the flange down to about 3/4. I am afraid 1/2 will be too small for the band clamp to hold. I caulked the flange to the lip. I weighted it overnight and after work today I'll run a bead of caulk around the outside edge and let that dry. I will probably not be able to try this out again until tomorrow after work. I'm not optimistic that this is going to work. If it does not, I will build an enclosure. I see, Jsbrow, that you used plywood. Is this a better solution than MDF? I'm kind of inclined to plywood also just because I have read so much about the bad in MDF dust. Also, is there a reason you still used flex hose? Is there any reason the enclosure could not just attach directly to the cyclone? It occurred to me but I don't know if there is a reason not to do that. My clearance is such that I think it would make more sense for me to go directly to the cyclone but I did not know if perhaps it was a concern for a flex point or something.

I have another question. What do you use to cut the wire in the flex hose? I did cut it but it was not easy, Also, if you cut it with a view to unwinding the wire from the hose, how do you cut the wire such that the hose is not also cut, or is the presumption that the hole will be plugged by whatever the hose is attached to?
 
Ed, I've come to look forward to your daily updates. Thanks for sharing so much detail about your efforts!

Collar: The foam gasket is only that - together with a strong adhesive. Securing the metal directly to your lid and applying caulk should be fine. I'm going to be mounting my takeoff the same way: under the lid, with 1" sticking above the lid, just to capture that extra 1/8th of an inch in clearance.

Flex Hose Connection: From all that I've seen, a flex hose connection is still a good idea because it will absorb the movement that will exist at the bottom of that long cyclone cone when in operation. Even with very little vibration in the motor and everything level and plumb, that cyclone cone is SO long that there will be some motion at the very end of it. Good to have a flexible joint there so as not to stress the motor mounting plate.

Cutting the wire in the flex hose: Bolt cutters work well. But some end snips with hardened cutters will also work - just need some large enough to provide the needed leverage and hard enough to be tougher than the wire. Yes, you do have to cut the hose, but only through the outer layer of vinyl immediately over top of the wire. And only a small cut sufficient to get your cutters to the wire is needed. Re-seal the cut with the same caulk you're using elsewhere or with the tape your using to seal the connection.

MDF vs Plywood: I prefer to work with plywood because of it's inherent strength and screw holding capacity. I also don't like generating MDF dust. Plus, I'm a big believe in "use what you have" - and I am more likely to have some plywood or can more likely use plywood off-cuts in a later project. But, MDF is great where you need mass and density of material and I'm contemplating making a mobile machine tool stand using MDF just to get that added mass for the base of the machine (not needed for the dust bin cabinet). I'll be interested to read jsbrow's comment on this.

Good luck in your next steps! I'll be traveling the next couple of weeks so may not be able to offer much comment for a bit. I'll try to check in on your reports as I can.

Cheers!
Rush
 
Last edited:
egbell,

Enclosure and cyclone attachment. If building the enclosure, connecting it to the cyclone with a minimal length of flex hose would allow for disconnecting enclosure and moving the dust collection chamber out of the way. This could become important down the road if the unforeseen requires removing the cyclone from is fixed position. Removing the cyclone from its hanging position could become quite a challenge if the cyclone were directly connected to the dust collection chamber. Additionally, I image that building an enclosure that is directly connected to the cyclone funnel would be more difficult than if the enclosure is built on the workbench and then slid into place. I cannot say whether there is any performance driven reasons for retaining the flex hose at the funnel outlet.

One gratuitous enclosure comment is that, if built, it may be a good idea to anchor the enclosure so that it does not move. Opening and closing the enclosure’s door to empty the barrel could cause the enclosure to shift and perhaps apply lateral pressure to the cyclone body, even if connected with a short piece of flex hose.

Cutting wire reinforced flex hose. I too had difficultly cutting the reinforcing wire in the 6” diameter flex hose. I used a hack saw blade and patience to make the cut. It was a slow go. I could have used bolt cutters but do not own a pair and was too cheap to buy it for this one application. I tried lineman’s pliers but, after ruining a pair due to the strength of the reinforcing wire, I went to the hacksaw blade. Also the short handles of the lineman’s pliers did not allow for enough applied force to even nick the wire; but I am apparently a weakling.

Before I cut the wire in the flex hose, I used a Sharpie to draw a cut line around the flex hose. Then the flex hose was cut with a utility knife. When the cut was complete, only the reinforcing wire held the two pieces of hose together. The hack saw blade was use to cut the wire. When I used this method, I managed to avoid any unintended damage to the flex hose, but a third hand would have come in handy when cutting the wire.

Enclosure construction materials. Like Rushton, I prefer plywood with a wood core versus MDF or MDF with a plywood veneer. MDF produces a lot of dust. My enclosure was built with a 2 x 2 frame and the outside of the frame was skinned with ½” thick plywood. However 3/8” thick plywood might also work. I would worry about movement of ¼” plywood, bowing in when the cyclone is sucking a vacuum inside the enclosure. The repetitive bowing might weaken the enclosure over time.

If ¾” thick plywood is used, glue and screwed butt joints could be used to form the box. Rabbeted corner joints would provide some additional glue surface and make the box stronger, although simple butt joints are probably strong enough.

No matter the thickness of the of the plywood used for the door, I believe it prudent to apply the plywood to a 2 x 2 frame where all the frame pieces are jointed flat and square. The frame on the door keeps the plywood flatter and allows for a better weather-stripped air-tight door seal. It also provides the depth and strength required for the window sash locks (if that is you choice of door latches). I have had no problems using ½” thick plywood attached to the door’s 2 x 2 frame.

¾” thick MDF could be a good choice for the door since it tends to remain flatter than plywood. However, I believe the 2 x2 frame for an MDF door is a good idea.

Hinging the enclosure door. I neglected to previously mention that I used a piano hinge for the door. The hinge was mounted on the outside of the door; to the door’s edge and the side of the enclosure. The outside mount allows for an air-tight seal on the hinge side of the door. However any hinges could be used so long as the hinges are either mortised in or mounted outside of the enclosure ; to afford an air-tight hinge side door seal.

The hinge was attached to the door. After weather-stripping was added, the door was clamped to the enclosure opening with just enough pressure to compress the weather-striping. The hinges were then attached to the side of the enclosure.
 
Thanks both of you for the input. I suspected that movement might be the reason to keep some flex hose. I am still wavering about cutting the barrel to a shorter height. It would make a lot of this hand-wringing go away about the limit of flex hose.

Jsbrow, excellent suggestion for cutting that wire... never thought of trimming it out of the vinyl first. I was able to make a cut with lineman pliers, but only after I was able to get the wire down close to the pivot where it was maximum force.

I am going over all of your suggestions mentally and coming up with some modifications. First, I'm thinking perhaps some pipe insulation that would sit in the inner tube... I'm thinking perhaps I could close the inner tube in a closed loop using contact cement to enclose the tube over the insulation and also provide a lip for mounting as you described. I'm also thinking more about the floating bottom that would pull the barrel up against the top to seal. Have to marinate on that... is it more work than just making the box. I agree that perhaps I should consider mounting whatever I do to the floor to minimize movement. I've already had some concern about the last 'mile' of ductwork that connected to my cyclone.

I ran the caulk this morning before work. Maybe it will be dry and ready to work with after work. I finish at 3pm. If it works, I may try the thing today. I need to cut my hair and trim my beard. That will be a good first test. I only do it once every few months.
 
Good afternoon:

I was able to get the lid on my barrel. It is much too tight for me so I'm going to do the enclosure, I think. I do have some lessons I have learned so far on the lid. First, the takeoff. I cut it down to 3/4 inch above the flange. I was trying to account for the minimal height I had. This left one rivet holding the rim together. I put 4 small screws/bolts through the holes to hold the flange to the lid. I caulked the flange/rim inside the barrel, and also between the flange and the barrel, weighted it and let it dry for almost 40 hours. Then I caulked the top and let that dry for another 24 hours or so. Today I used Jsbrow's tip for cutting the wire out of the flex hose. Took a little bit but got it done. I put the wired side of the hose onto the takeoff and tightened it. This caused the takeoff to kind of spin on the rivet and break the caulk seal inside the barrel. I moved on. I got the lid on the barrel. For some reason I thought the rim opened. It does not. It just kind of expands. Had to take the lid off, put the ring on and put the lid back on. Fastened it down. I need to recaulk though I could not detect any leaks, but I am probably wrong about that.

I started the cyclone. I had not initially envisioned leaving it run most of the time. I understand why that is necessary now because of the effect of too much cycling of the motor. The noise is not trivial but I wear hearing protectors. I don't know what this sounded like upstairs yet. Will talk to the wife after I post this.

I grabbed some handfuls of dust from my shop floor, turned on the cyclone and started feeding it into one of my drops. It *IS* cool and my grandkids are probably going to love this. I don't know how long the novelty will last but I have a feeling they are going to be fighting for sawdust in the floor sweep (which I expect to be my first order of business).

Here is a question. I fed saw dust and an occasional chip here and there. What I'm calling a chip is the kind of piece of wood that breaks out of a knot or from a gouge on the end of a board... something like that. Some of the bigger chips kind of suspended in the cyclone. Did not go into the barrel... just kind of floated/spiraled. Is this a sign that my joint is leaking at the barrel lid? I'm presuming that until I hear otherwise.

The tight fit of the barrel lid and the effect it has on the joint has convinced me that I need to do an enclosure. I don't think I need to cut the barrel down, but if it is more work to keep tweaking things, I will do that too (or maybe instead). I am also going to eventually enclose the whole unit, or at least as much as research tells me will help with the noise. I am just really glad that everything still works. I won't be totally satisfied until this time next year, I'm sure.
 
Good afternoon:

Jsbrow: The link you provided for your 6" flex hose... do you recall what item you ordered. I see one for $12.39/foot... FLX30 Tough Stuff... it does not mention smooth interior so I wanted to make sure this is what you were looking at. There are items at that price in their drop box but it is not as clear (to me) which of the items are actually involved. The one I *thought* you might have gotten was clear but with yellow racing stripe. (That is what I'm calling it). I did not know if that would be an issue if/when I eventually add a bin sensor.

I'm still wavering on the enclosure.... also toying with cutting the bottom of my barrel and replacing it with an MDF. I don't have a router trammel but I suppose I could make one. If I go that route instead of making a new lid, I will still make some modifications to my lid... a wooden or PVC board 'bezel' to hold a 6 inch mounting attachment of some kind (I envision epoxied 6" pipe fitting) for the hose... and a couple other ones to add a viewing window and some light like you did. Sams club sells a set of battery LEDs that can be turned on with a remote control or you can just push in the dome. I'll figure something out.

I have been using my cyclone here and there.. scoop up saw dust, run a magnet to catch nails, etc., and then feed it up through a drop. I also cut my hair under one yesterday. It is all really cool and I can't wait to show my grandkids.

I'm also looking at a hood for my mitre saw.. I think it is foxcap.. something like that. Also Roussef, I believe. There are a couple. Does anyone here use one of those with the cyclone. And if so, what size is the port. I'm thinking I could go either way with that.. .2 4 inch hoses or one 6 inch. If it works for a mitre saw, I kind of think it would work for my radial saw too. They are not cheap but they would eliminate a lot of work, material, and design trial/error. I'm leaning that way.. would like to hear an endorsement or warning.
 
egbell,

6” Flex Hose. My records indicate that the 6” reinforced flex hose carries two identifying codes at BlastGates.com:

FLX-30 and HFLX3006

The description from my records is “Polyurethane 6" diameter x .030 mil”.

For more info, here is a link that will show the manufacturer’s (Flexaust) product catalog. Click the “2018-2018 Flexible Hose, Ducting & Accessories” icon to view the catalog link. This catalog link is found under “Products” tab . The FLX-30 product is called Flx-Thane® MD.

http://www.flexaust.com/group/industrial-hose/#

My FLX-30 has no yellow stripes. The flex hose is clear and the reinforcing wire spirals along the length of the hose and is copper colored, although I can say for sure that the reinforcing wire is far more difficult to cut than copper would be.

I may have misspoken in an earlier post. The 6” FLX-30 does not feature a smoother interior wall; I just now did a physical inspection. The Flexaust catalog lists Flex-Tubes which feature the smooth interior walls. I purchased the 4” versions of the Flex-Tube® PV and Flex-Tube® PU. While both feature smooth interior walls, the Flex-Tube® PV is more flexible and easier to work. However the FLX-30 seems more flexible than either the Flex-Tube® PV and Flex-Tube® PU but that may be due, at least in part, to the 4” versus 6” diameter. I would intuitively expect the large diameter hose to be more flexible.

I used the short length of 6” flex hose provided by Clearvue when making the transition from the cyclone to the dust collection container. The light beam of the McRabbet Bin Level Sensor passes through the Clearvue provided flex hose without any problem. The FLX-30, while clear, is somewhat opaque and could perhaps absorb too much light. My fear would be that the McRabbet Bin Level Sensor would not work properly with the FLX-30 flex hose. But that is a guess.

I would be concerned that the wide spiral reinforcing band around the Flex-Tube® PV and Flex-Tube® PU flex hose could also obscure the McRabbet light beam.

McRabbet Bin Level Sensor. I highly recommend the McRabbet Bin Level Sensor! Even with the illuminated dust collection chamber and viewing window, I managed to overflow the dust collection barrel. The bin level sensor shut the cyclone off thus greatly limiting (almost eliminating) the large shavings and debris from making its way to the filter stack. Had the filters picked up the large debris, it would have been hours of compressed air backwashing of the filters. It is difficult and time consuming enough to air-backwash the filter to clean off fine dust.
 
Good morning:

Thank you! I spent much of Saturday and Sunday researching hose. I found a lot of interesting sources. One was Canadian Woodworker.

https://www.canadianwoodworker.com/webstore/wecs.php?store=wood&action=display&target=CWI-H6-PU

The writeup is interesting and they explicitly mention smooth interior. I did start to wonder about smooth interiors on corrugated/flexible hose. Isn't the smoothness of the interior of the hose going to be in some kind of proportion to the extension of the hose.

The site you recommended is one of the ones I looked at over the weekend, and I like the cross section of the hose that they provide. The one you recommend seems pretty smooth to me, going by that cross-section display, though it is not explicit. Going by the icons on the lists, it seems you went with one designated for materials rather than on that was also designated for dust. Is this because of what you expected to process? I am just curious. I have to buy within the next day or two, so I have to consider a lot of things in a short amount of time.

I don't see the 'smooth' designation on the hose ClearVue sells or there would be no decision to make. For short runs (i.e. 4 to 6 feet at the end of a drop), is the turbulence that much of an impact? I'm not going to be vacuuming tape measures. Best Buy tried to sell me a TV one time by telling me how many Brazilian colors it could support. I had to ask if a fat old bald guy was going to differentiate those colors sitting on a living room couch. He said that guy was not, and i have to force myself sometimes to ask if the impact of a hair less than perfect is going to be noticeable in a small shop sucking dust out of a 12 inch chop saw. I'm going to go for the smooth, but I truly hate shopping! At some point, I have to "move forward (Rushton)"

Jsbrow: I focused on polyurethane because that is what you mentioned. I researched that because I wondered about why you did that. Now I understand. I'm absorbing the expense of this hose, and by that I mean mentally. Everything seems to occur in $250+ increments and I have been feeling numb lately looking back on what I've spent on the device, the duct work, etc. I look at the prices, wince, and then make the purchase. That is what I'll do with the hose too... it will be today or tomorrow.

I think I can run 6 inch hose to my radial and my mitre saw. FOr most of the other tools, I expect dual 4 inch, and the reason that is relevant is that I have to figure out the ideal length of 6 inch hose, and most of the merchants think in 10, 12, and 25 feet.

For the cyclone to barrel connection, I did something I don't like to do and I'm paying a price, now, that causes that dislike. I tried to make the barrel / cyclone connection by cutting down the 6 inch piece of hose, as suggested. It was not an acceptable result so I'm going to cut the barrel, I believe. That means that I have to source another piece of hose for that.

I want a bin sensor, but the cost is another consideration. I see many locations discussing construction and I think it would be fun/interesting. I may ultimately consider the cost of my time (which I value highly) and materials and aggravation (which has a premium to me also) and buy one, and if I do it will certainly be the McRabbet version. The problem is not the price, so much, as it is the cumulative amount spent in the last month or two on just this project.

Thank you for the information. My purchase is imminent so it is VERY helpful!
 
Egbell,

You seem a bit frustrated with finding an appropriate flexible duct and it appears you are trying to find the perfect "smooth" walled type. I would recommend buying from McMaster Carr their 6" Very Flexible Duct Hose, which sells for less than $4/foot if you buy 25 feet (which I recommend). It is a clear PVC duct with 0.015" thick walls and yes, it will have static build-up when carrying dust. But it is strong, reasonably priced and I've used it for many years without issues. Any flexible duct will have more resistance to air flow than straight duct; worst case scenario would be 1 foot being equal to 10 feet of straight pipe (i.e., very high static pressure loss factor), but this duct is no where that resistant to flow. Remember that it is always best to minimize the length of flexible duct runs wherever possible to minimize any S.P. losses. Your cyclone has plenty of capability to draw dust laden air from your tools; don't get obsessed with finding the perfect flexible duct, but find one that works well and won't destroy your budget. Just my opinion.
 
Hi Rob:

I am not a good shopper. I have evaluated everything everyone has had to say and I ordered the hose from BlastGate earlier today. My budget disintegated weeks ago. As anyone who would look at me would see, I have never gone, and will not go, hungry. I'm not financing this. It is just that when I first started researching, I did not know about ClearVue or Bill Pentz or where it stood in the range of things. I anticipated much less but I do recognize excellence when I see it. (Anticipated is a better word than budget.) I just feel worn down by all this buying, and you are right... I get obsessed with perfect until reality tells me it is not always worth the extra cost. I did purchase 25 feet of what Jsbrow recommended. I told my wife, and she said 'in for a penny, in for a pound'. I am trying to minimize it and I suspect at 25 feet I'm going to have a bit left over when I'm done. I have room to grow.

I have to believe this is as close as I'll ever get to having a baby. I feel pain, but this time next year it will be gone and I will not have any regrets.

Thanks!
 
Good morning:

My hose arrived yesterday.. not bad since I only ordered it on Monday. Now... I did not buy the clamps yet. Is there a best type of clamp? I see bridge type and just flat type. Is the bridge type significantly better than the flat ones? The biggest difference so far that I see is price. The bridge clamps can run $50 for 10 or 12, or about 1/2 for just flat ones. And I see two different types of bridged.. a type of wire and the band with the piece that bridges the spiral wire.

And finally, do the spring types work as well as the screw types?
 
Back
Top